Inaugural Hands On Ground Ladder Classes- Now Open

Posted 03/09/2015 by IRONSandLADDERS
Categories: 5. Ladder Work

These are the first two hands on ground ladder classes we are opening to firefighters from any department. We have been working on the development of this class for a while now and have finally started booking dates around Colorado. The flyer has the class description and registration information. Sign up soon at the lowest price we can offer for this class. Our host site is West Metro Fire in Lakewood CO.

Screen Shot 2015-03-09 at 12.21.08 PM

Drop Bar Weak Points

Posted 02/25/2015 by IRONSandLADDERS
Categories: 1. Forcible Entry

Tags: ,

Screen Shot 2015-02-25 at 7.20.53 PM

Drop bars are by far the most common secondary security device we find on doors. Most setups take very little skill to build and they provide good protection from most criminals. This makes it appealing to most business owners, it can be done with their skill level and common materials. If the business owner wants to spend a little more money they can have a wide variety of styles fabricated. I have too many pictures of drop bars to count, the designs are endless and limited only to the citizens imagination. I have been fortunate enough to force drops bars that were very weak all the way up to some designs that were extremely strong. Over and over again we find that solid techniques with a good order of operations will defeat almost everything they can come up with. I know we have the extremes out there, that will cause a curveball no matter what type of tactic you use. However a large majority will always show there weak points with our standard tactics.

Here is how we approach a door that is showing signs of a drop bar.

A. Gap-Set-Force. So many doors are defeated before you move on to anything other than standard prying with the Irons. This is our Plan A and I like to try it every time. It either defeats it or gives you a real good feel of the door.

B. Add a 6′ Hook cheater bar (or a second firefighter on the Halligan) It is quick and it adds a ton of leverage. We have found it extremely effective and again saves you a ton of time when it works.

C. Defeat the bolts closest to the lock side of the door. Doesn’t matter if you use saws or you drive the bolts through. The key is to attack the bolts on the lock side. Then go back to prying.

D. Anytime you get enough spread in the door during this process you can insert this move. When the door spreads even a few inches. Stick the NY hook or the axe head into the gap and pound the bar up and out of the mounts.

E. Worst case scenario, you take out the last set of carriage bolts on the hinge side of the door. This is rare you have to go that far, but every once in a while if it is really holding on.

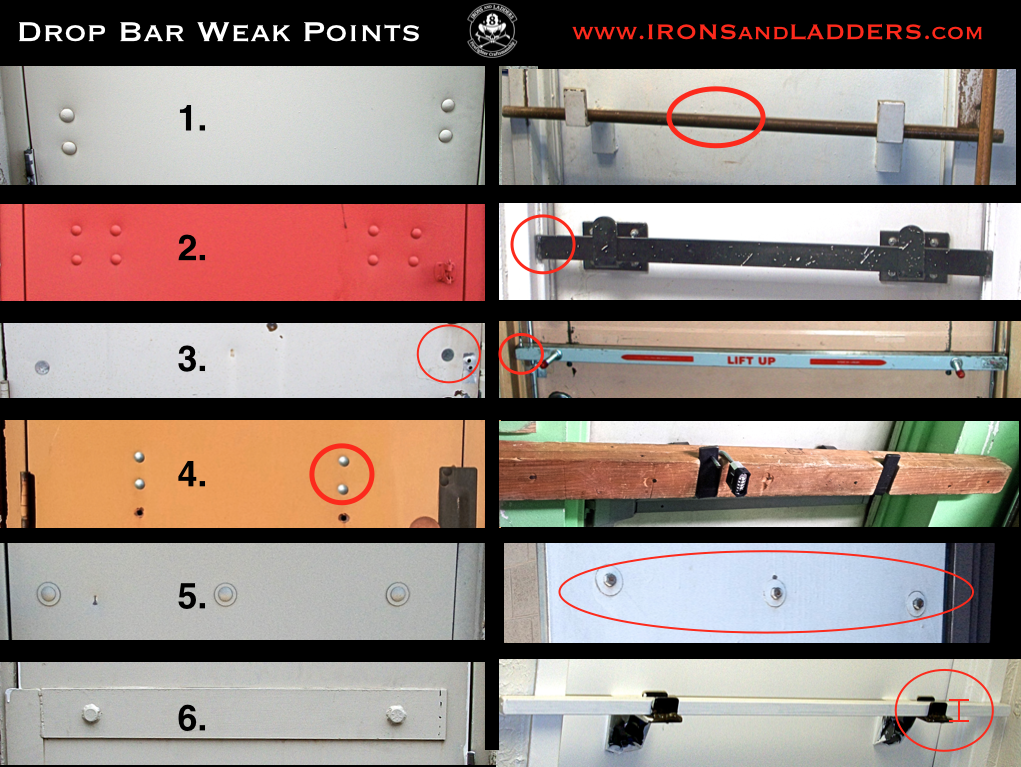
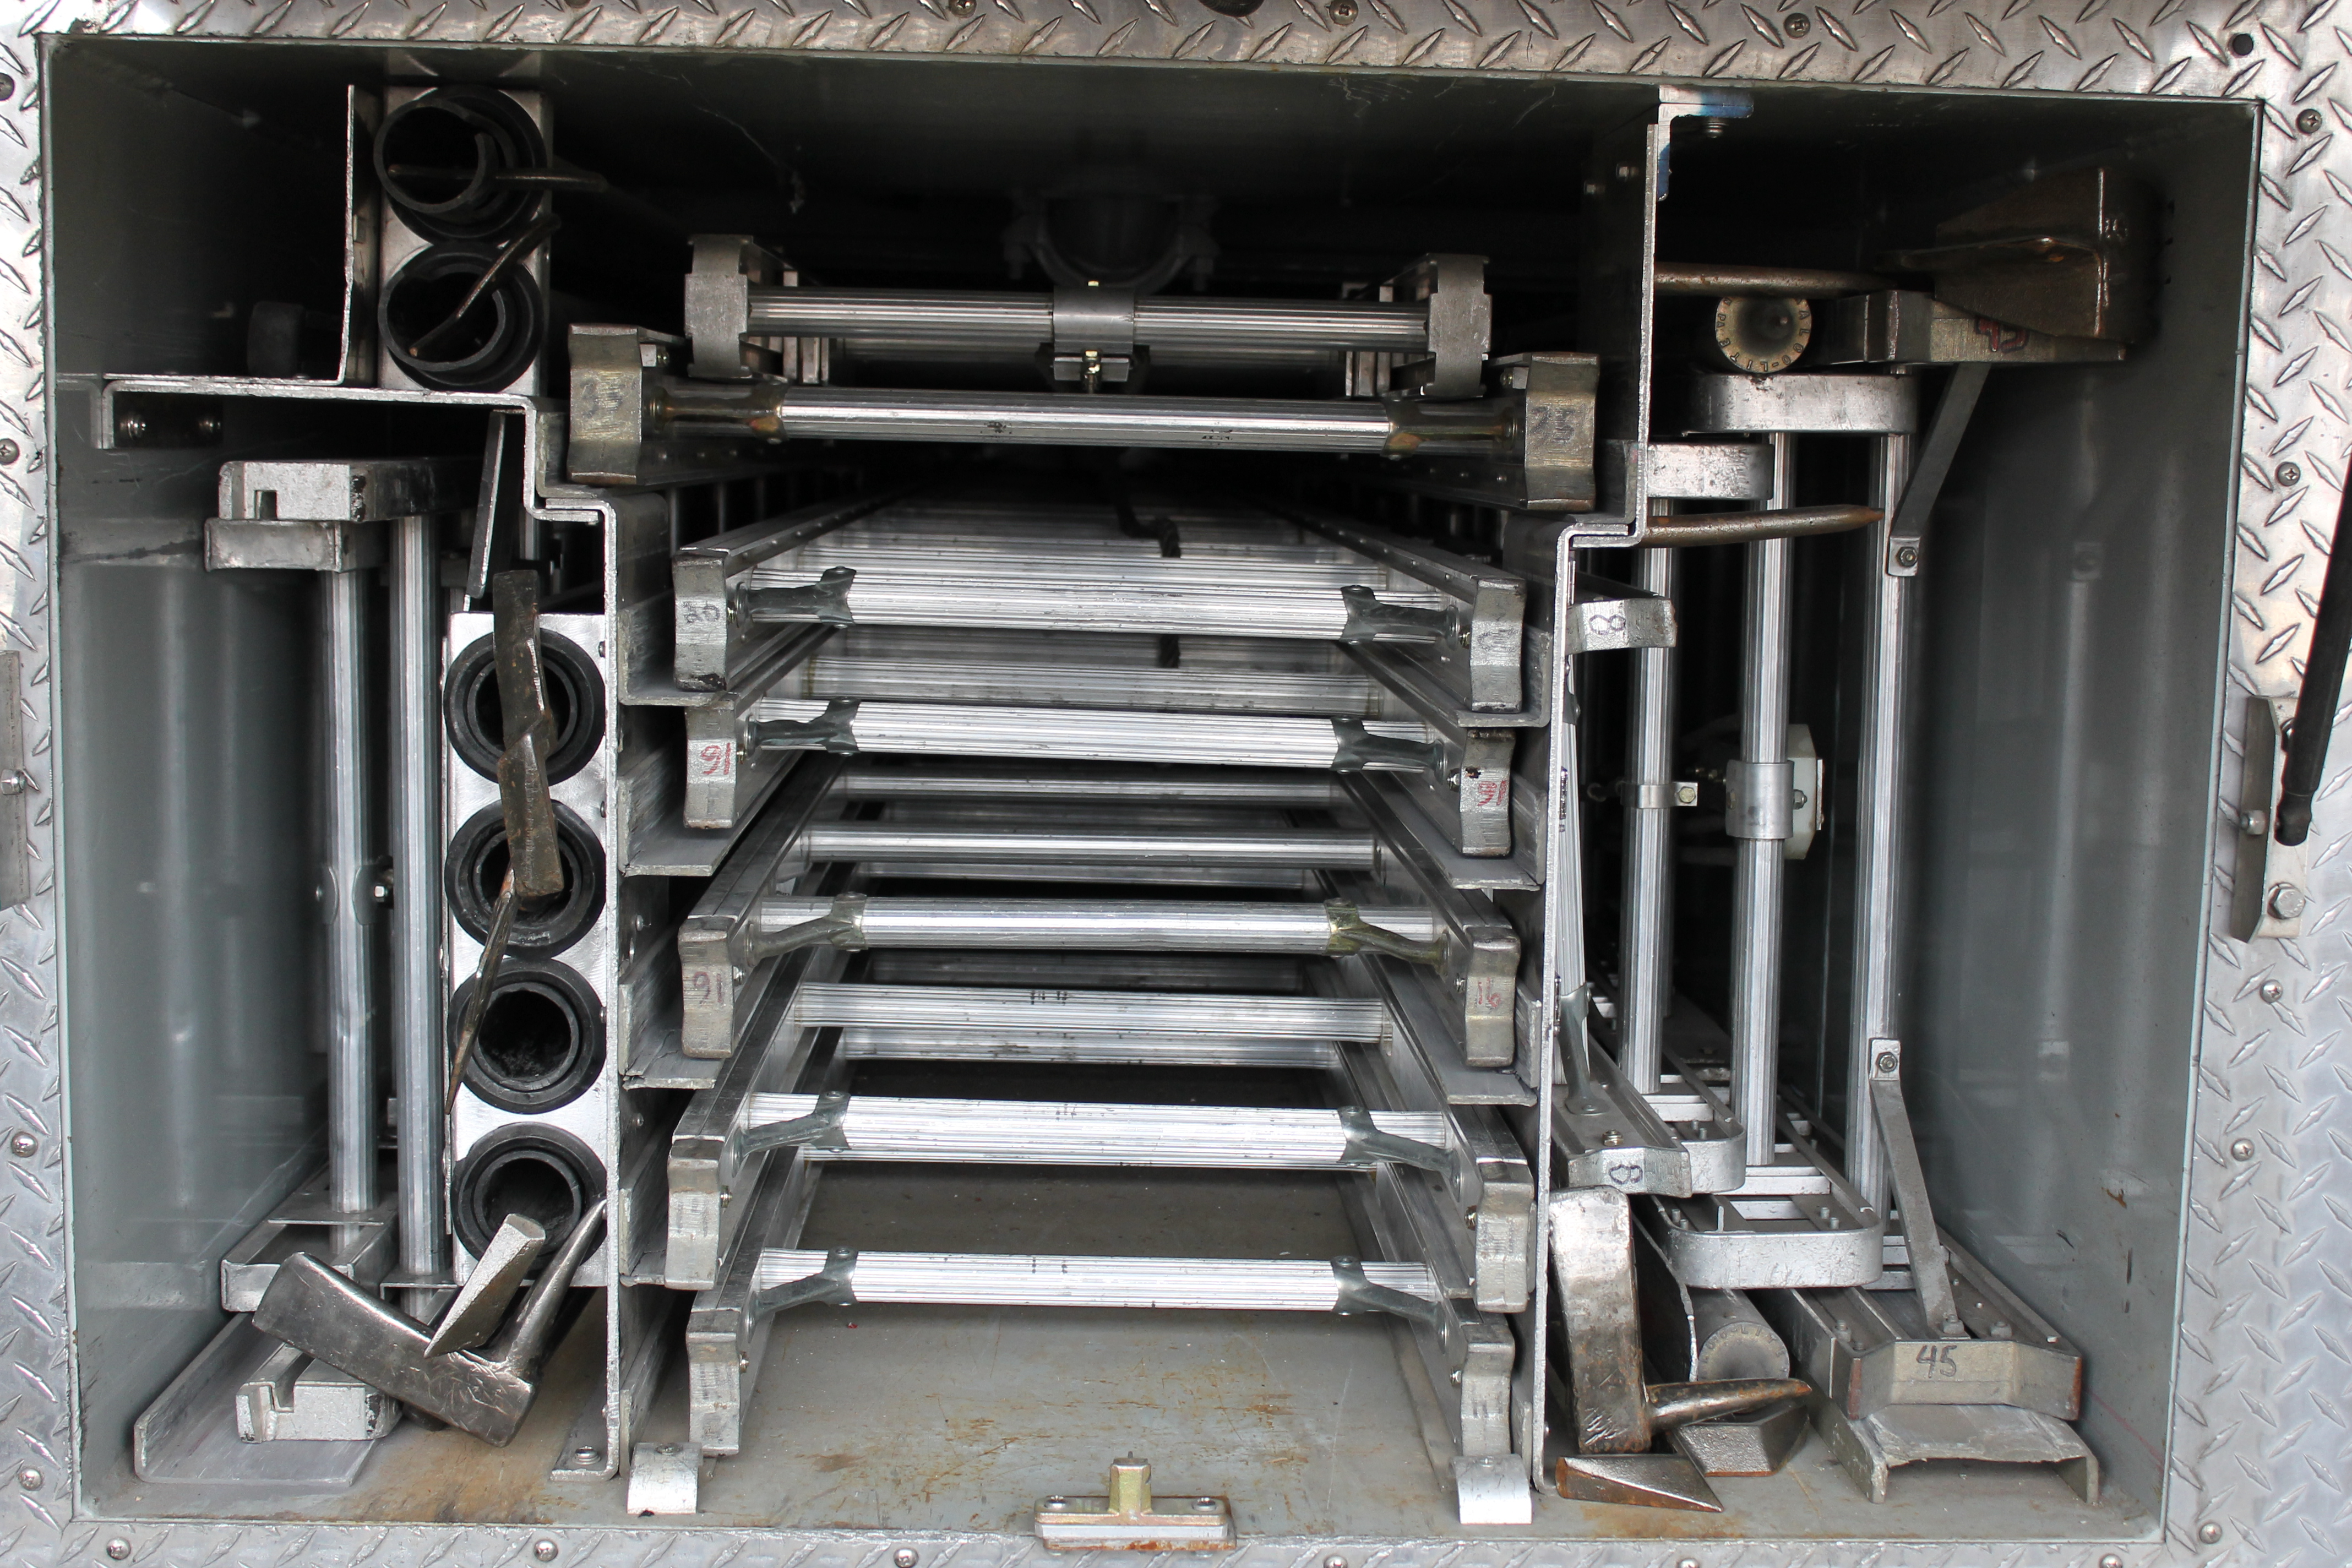
Look at the picture below and we will hit a couple of the weak points that reinforces the tactics we listed above and why we do them in that order.

Bar #1 – A very standard looking bolt pattern with standard drop bar mounts. All of that is secured with an old broom stick. Gap-Set-Force defeats this before you ever have to move past Plan A.

Bar #2 – Strong looking bolt pattern, strong mounts, 1/2 steel bar, all good materials used in this setup. The weak point is they made the bar go behind the 1/2 jamb instead of making it go behind the wall. With good prying you will defeat this bar because of the lack of bite it has on the metal frame. I’ll bet GSF defeats this, but worse case you add the 6′ hook and this is a goner.

Bar # 3 – Commercially made drop bar. Usually these tend to be weaker than most homemade versions. A couple weak points on this one. A single bolt is used for each mount, and again like the last bar it is only mounted behind the jamb instead of the frame. GSF should win again, but driving a single bolt if not will take this bar out without question.

Bar# 4- Standard bolt pattern followed up by a substantial 4×4 that goes all the way behind the wall. The mounts are also made of good steel and have a padlock to prevent us from sticking a tool in and knocking it out. It still has a weak point. Prying may not get you as far on this door, but you have two carriage bolts exposed on the outside that will easily disable the strength of this system.

Bar# 5- Three mounts showing from the outside instead of two, they are also reinforced with washers which can make driving them with a Halligan a little more difficult. However, this door reinforces why we always try GSF with our Irons first because I can’t tell you how many times we have seen them removed like you see here.

Bar#6 – Very impressive setup from the outside of the door. Large bolts that have been welded to a thick plate. This makes driving bolts through a poor choice and even makes saw work difficult. But if we stick to our plan we will expose the weak point during our prying operation. Don’t let the plate distract you. The mounts have a flaw, they are very short, so even though the bar is well made from steel the height and thickness of that mount has proven to us over and over again that we will usually defeat this with GSF and adding in our 6′ hook for leverage.

Long winded I know, but just a couple of thoughts of why we do what we do. We really go in depth on how to defeat drop bars in our hands on forcible entry classes. If you are not in our area we also have a large collection of YouTube videos defeating many of the drop bars that you see in this picture. Check it out.
Thanks
Ryan Royal
IRONS and LADDERS LLC.

Security FD Open Enrollment Forcible Entry- Now Open

Posted 02/24/2015 by IRONSandLADDERS
Categories: 1. Forcible Entry

This class is now open, all registration information is on the flyer. This class will fill very quickly and it looks like we will only have a small amount of additional spots. SecurityFLYER-PDFScreen Shot 2015-02-24 at 5.18.17 PM

Open Enrollment Class in Fort Collins March 21st

Posted 02/12/2015 by IRONSandLADDERS
Categories: 1. Forcible Entry

This is the first forcible entry class of the season and is being hosted by The Terry Farrell Fund of Colorado. This is their annual training conference held in Fort Collins CO. They put on a good show and are great hosts. This class opened yesterday and I know a large number of the spots have already filled. Please visit their website or use the information on the flyer to register.

Our class will only be held on March 21st and is a full day class. Proceeds will be donated to the Terry Farrell Fund – CO

Visit their website for more information on the entire conference or to register for our class. http://www.terryfund.org/colorado-news/item/195-march-conference

10869634_969975859699216_1138437166381719207_o

Hands On Ladders Class- Boise Firefighters Symposium hosted by Fire Nuggets.

Posted 02/02/2015 by IRONSandLADDERS
Categories: Uncategorized

We are proud to announce our participation in the  Boise Firefighters Symposium on June 2nd, 3rd and 4th. We will be rolling out our brand new Practical Ladder Work class. Which is a hands on ground ladders class. We will have a classroom session in the morning that prepares you for quick accurate size ups for choosing the right size ladders. We also cover how to prioritize which ladders go where on multiple different types of buildings and fire scenarios.
The hands on portion will be focused on all sizes of ground ladders. How to get the maximum efficiency of 1 and 2 firefighter throws along with ladder packages, carries with tools, overcoming common fire ground obstacles, untraditional ladder throws, etc.

This is a great conference lineup and we are humbled to work alongside some very well known and respected fire service instructors. Jeff Shupe, Daryl Liggins and Rick Payne will be teaching their Engine Co Operations Class and Brothers In Battle, LLC will be putting on their full day forcible entry class.

Visit http://www.cvent.com/events/boise-firefighters-symposium/event-summary-8a2157c69cdf401994df989f90f1eae6.aspx to register and for more information on this conference.

Screen Shot 2015-02-02 at 8.07.02 PM

Agressive Ladder Work With Rescues (Video)

Posted 01/06/2015 by IRONSandLADDERS
Categories: Uncategorized

Fantastic work by this company. It is refreshing to see some guys moving with urgency and confidence, clearly knowing their job and how to make things happen. Aggressive and well trained when it really counts. It is very clear that this isn’t their first rodeo and they don’t subscribe to the “we will figure it out when we get there” attitude. Strong work.

Shaving Carriage Bolts v.s. Plunge Cutting Carriage Bolts

Posted 01/05/2015 by IRONSandLADDERS
Categories: Uncategorized

This video gets down into the details of why we shave carriage bolt heads v.s. when we plunge cut the shaft of the bolts. Both have advantages and disadvantages, understanding them is what will make it smooth on the fire ground. This is one little step in the big picture of commercial forcible entry. Watch rest of our videos for full evolutions of commercial forcible entry on YouTube under IRONS and LADDERS.

Vertical Vent Photo Series (Before and After)

Posted 12/16/2014 by IRONSandLADDERS
Categories: 4. Ventilation

Here is a great set of photos of Truck Co. 1 in Colorado Springs going vertical on a chimney fire that spread to the attic this week. The photos give a good view of vertical vent instantly clearing the smoke conditions from the perimeter of the attic and interior of the house, along with slowing horizontal spread through the attic. As you can see by the short amount of time they had fire from the hole, this was timed very closely with interior hose lines knocking down fire. This was a very cold morning which you can also see in the color of the smoke which is pretty common in the winter time. It is always nice when you have a set of pictures that shows the before and after of vertical vent in action. These great pictures were taken by Steven (Smitty) Smith of  SDSFirePhotos

IMG_4904 IMG_4905IMG_4915 IMG_4914  IMG_4920-L

Marriage Invitation: Hook and Halligan

Posted 11/29/2014 by IRONSandLADDERS
Categories: 1. Forcible Entry

Tags: , , , ,

You are cordially invited to make your outside vent tools more user friendly and efficient. The Halligan and 6′ hook has long been the baseline set of tools for the outside vent position. In my fire department the OV position is the “ladders firefighter” (FF sitting behind the driver). This position has a large amount of duties to accomplish when arriving as a first due truck. The driver is the other part of this two person team but we routinely operate by ourselves around the outside of the building performing similar duties. The only time we strictly operate together is during vertical ventilation or during vent enter search. The ladders firefighter will be laddering above grade windows, removing window bars, forcing the c-side door for egress, and performing a horizontal vent when needed.

This gives you a general idea of how that seat works for us and why this position carries a certain tool compliment. When I am riding Ladders I carry a Pig in my belt, with a 6’hook married to a Halligan. The tool in my belt along with the Halligan married to the 6′ hook allows for maximum efficiency because I still have a free hand to bring ladders to the building each time I walk to the truck. I think it is poor practice as an outside vent firefighter to only carry a hook and then have to return to the truck for a Halligan to force the c-side door or remove stubborn window bars. Both which are critical duties that should be accomplished in the first few minutes of our members operating interior.

Here’s the solution for us, and by no means did I invent this. Companies all over the country have been utilizing chain links to marry their hook and Halligan long before I was even in the fire service. I  get a lot of questions and emails about this concept and hope I can make a few peoples jobs a little easier.

It’s a simple fix and we have used it on several hooks for many years. By welding a chain link at the appropriate height on the hook it allows you to put the forks of the Halligan over the chain link, then squeeze the tools and slam the base of the hook on the ground. It will cause the forks to bite into the chain link and creates a very tight bond with the tools.

IMG_4853 - Version 2

IMG_2734

IMG_2733

IMG_2732

This creates a very easy one hand carry of the tools and reduces hand fatigue. If you currently don’t have these tools married you know that you have to keep a tight grip on them and it is not uncommon for the tools to separate half way to your target. This will be eliminated with the chain link. The bond is tight enough that once you get to your location you very rarely can pull them apart by hand. If I am on concrete or asphalt I will just throw the tools on the ground while I throw my ladder. The impact on the ground will separate them. The other option is to flip them upside down like the photo below and bump the head of the roof hook on hard ground or against the foundation of the house, etc. This will also easily separate them.

IMG_2735

There is no set measurement for the chain link that I can give you. This article is obviously on a Pro Bar, but it is going to vary by the brand of Halligan. There are Halligans out there that this will not work with. If you are using a Pro Bar there is some variances on this measurement based on the age of the Pro Bar. I like to make this chain so that all of them will marry up regardless of age.

To get your spacing right, marry up the Halligan with the hook in one hand and slide your chain link in between the forks with the other hand. If the Halligan is pulled down flush to the hook now is the time to give it some space. Your goal is to leave some space between the bottom of the adze where it will touch the top of the hook. The picture below is taken with the Halligan just lightly sitting on the top of the chain. If you leave about a 1/2 inch where that dirty fat finger is, you will end up with enough room to give a nice solid bite on the chain link when you slam the base on the ground.

IMG_6268

If you don’t leave enough space the Halligan will bounce off the top of the hook before you ever get a bite. If you are unsure of this, lean towards a little too much space rather than too little. Too much space will still marry the tools together when you bite the chain, even if there is a left over space between the tools. Too little will cause the Halligan to bounce off the hook before it sets properly.

IMG_6272

The picture above is after the tool has been slammed on the ground and the Halligan bites the chain. You can see the nice tight fit between the tool heads. Once you find the spacing for your Halligan, make a mark on the chain link and a mark on the roof hook.

IMG_2729

Once you have your mark, just use a small tack weld to hold the link to the hook, now put the Halligan back on and just dry fit your mark. Don’t slam the tool down, but see if you like your spacing. If it looks good, run a bead and call it good. I have never had one of these links fail or cause the hook to weaken or bend in any way, shape or form.

IMG_5523

Now you have yourself a set of combat ready outside vent tools. I slide mine in the slot at the bottom left of this ladder compartment, they’re married together and pull out very clean and quick. I pull my tools, then select my ladder and I am ready to move within seconds (no extra fumbling around or assembly required!)

IMG_1016

IMG_6266

IMG_1022

Fire and Smoke Conditions Video

Posted 11/22/2014 by IRONSandLADDERS
Categories: 4. Ventilation

This is one of the best pre arrival videos I have seen showing fire and smoke conditions. It is a great one to watch at the kitchen table and discuss tactics.  Lots of good points to talk about here and what you might do with your own departments response and tactics.

First line? Second line?

Vertical vent? If so what location? If you wouldn’t vertical this how would you vent it?

Search opportunity and where’s the survivable space?