Posted tagged ‘halligan’

Halligan By The Numbers

04/23/2015

Editor Note: The mechanical advantage of a Halligan has been a recent topic on some training forums. A friend of mine decided to sit down and put on paper what many of us explain when teaching the use of the Halligan. Before you read this I would like to start by saying this is an article for firefighters that like to keep working towards a better understanding of what they are doing and why they are doing it. Does a firefighter need to know the complete break down of mathematics regarding the leverage of the Halligan to force a door correctly? No, not at all. But a firefighter that is instructing others on how to use this tool should have a very solid grasp of how to use the different fulcrums of the tool and should be able to explain where you have more or less leverage depending on how you use it. This article allows you to take a detailed look at what the numbers can look like. This is for those of you that pay attention to the details but still understand the practical application of how this translates to actually using the tool. Understanding leverage and fulcrums is a big part of our job, during the overhaul portion of a fire ground it is very easy to see who has good understanding of tools and their leverage points, hopefully this helps bring a little further understanding to this topic. 

 Halligan By The Numbers
By Ben Shultz 

Let me start off saying that I do not hold a degree in applied mathematics, trigonometry or physics.  I do however like putting numbers and statistics to things that I do.  It’s simply what works for me and helps to solidify concepts in my mind.  So, with that said, here is a short document about the mechanical advantage that we create with the halligan.  There are some folks out there that would tell me how I forgot to factor in Pi, a cosign, theta, etc. and therefore my math isn’t perfect.  They’d be correct.  But, when we keep things simple and look at the halligan as either a class I or II lever, we can still come up with some decent numbers to show the force it can create in different applications.

Quick overview of levers…they are a simple machine.  They fall into three classes – I, II, or III.  In the case of the halligan, it operates in the class I and II mode.  Below you will see an example of a class I lever and how mechanical advantage (MA) is calculated.  Example: a seesaw.

Screen Shot 2015-03-12 at 9.59.28 PM

Below here you find a class II lever and MA equation.  Example: a wheel barrow.Screen Shot 2015-03-12 at 9.59.36 PM

So, you can see in either mode, we need to know the distance from the force (the firefighter) to the fulcrum, and we need to know the distance from the load (the door) to the fulcrum.  These numbers allow us to arrive at our MA.

So, here’s what we know about the halligan before we even apply it to a door…

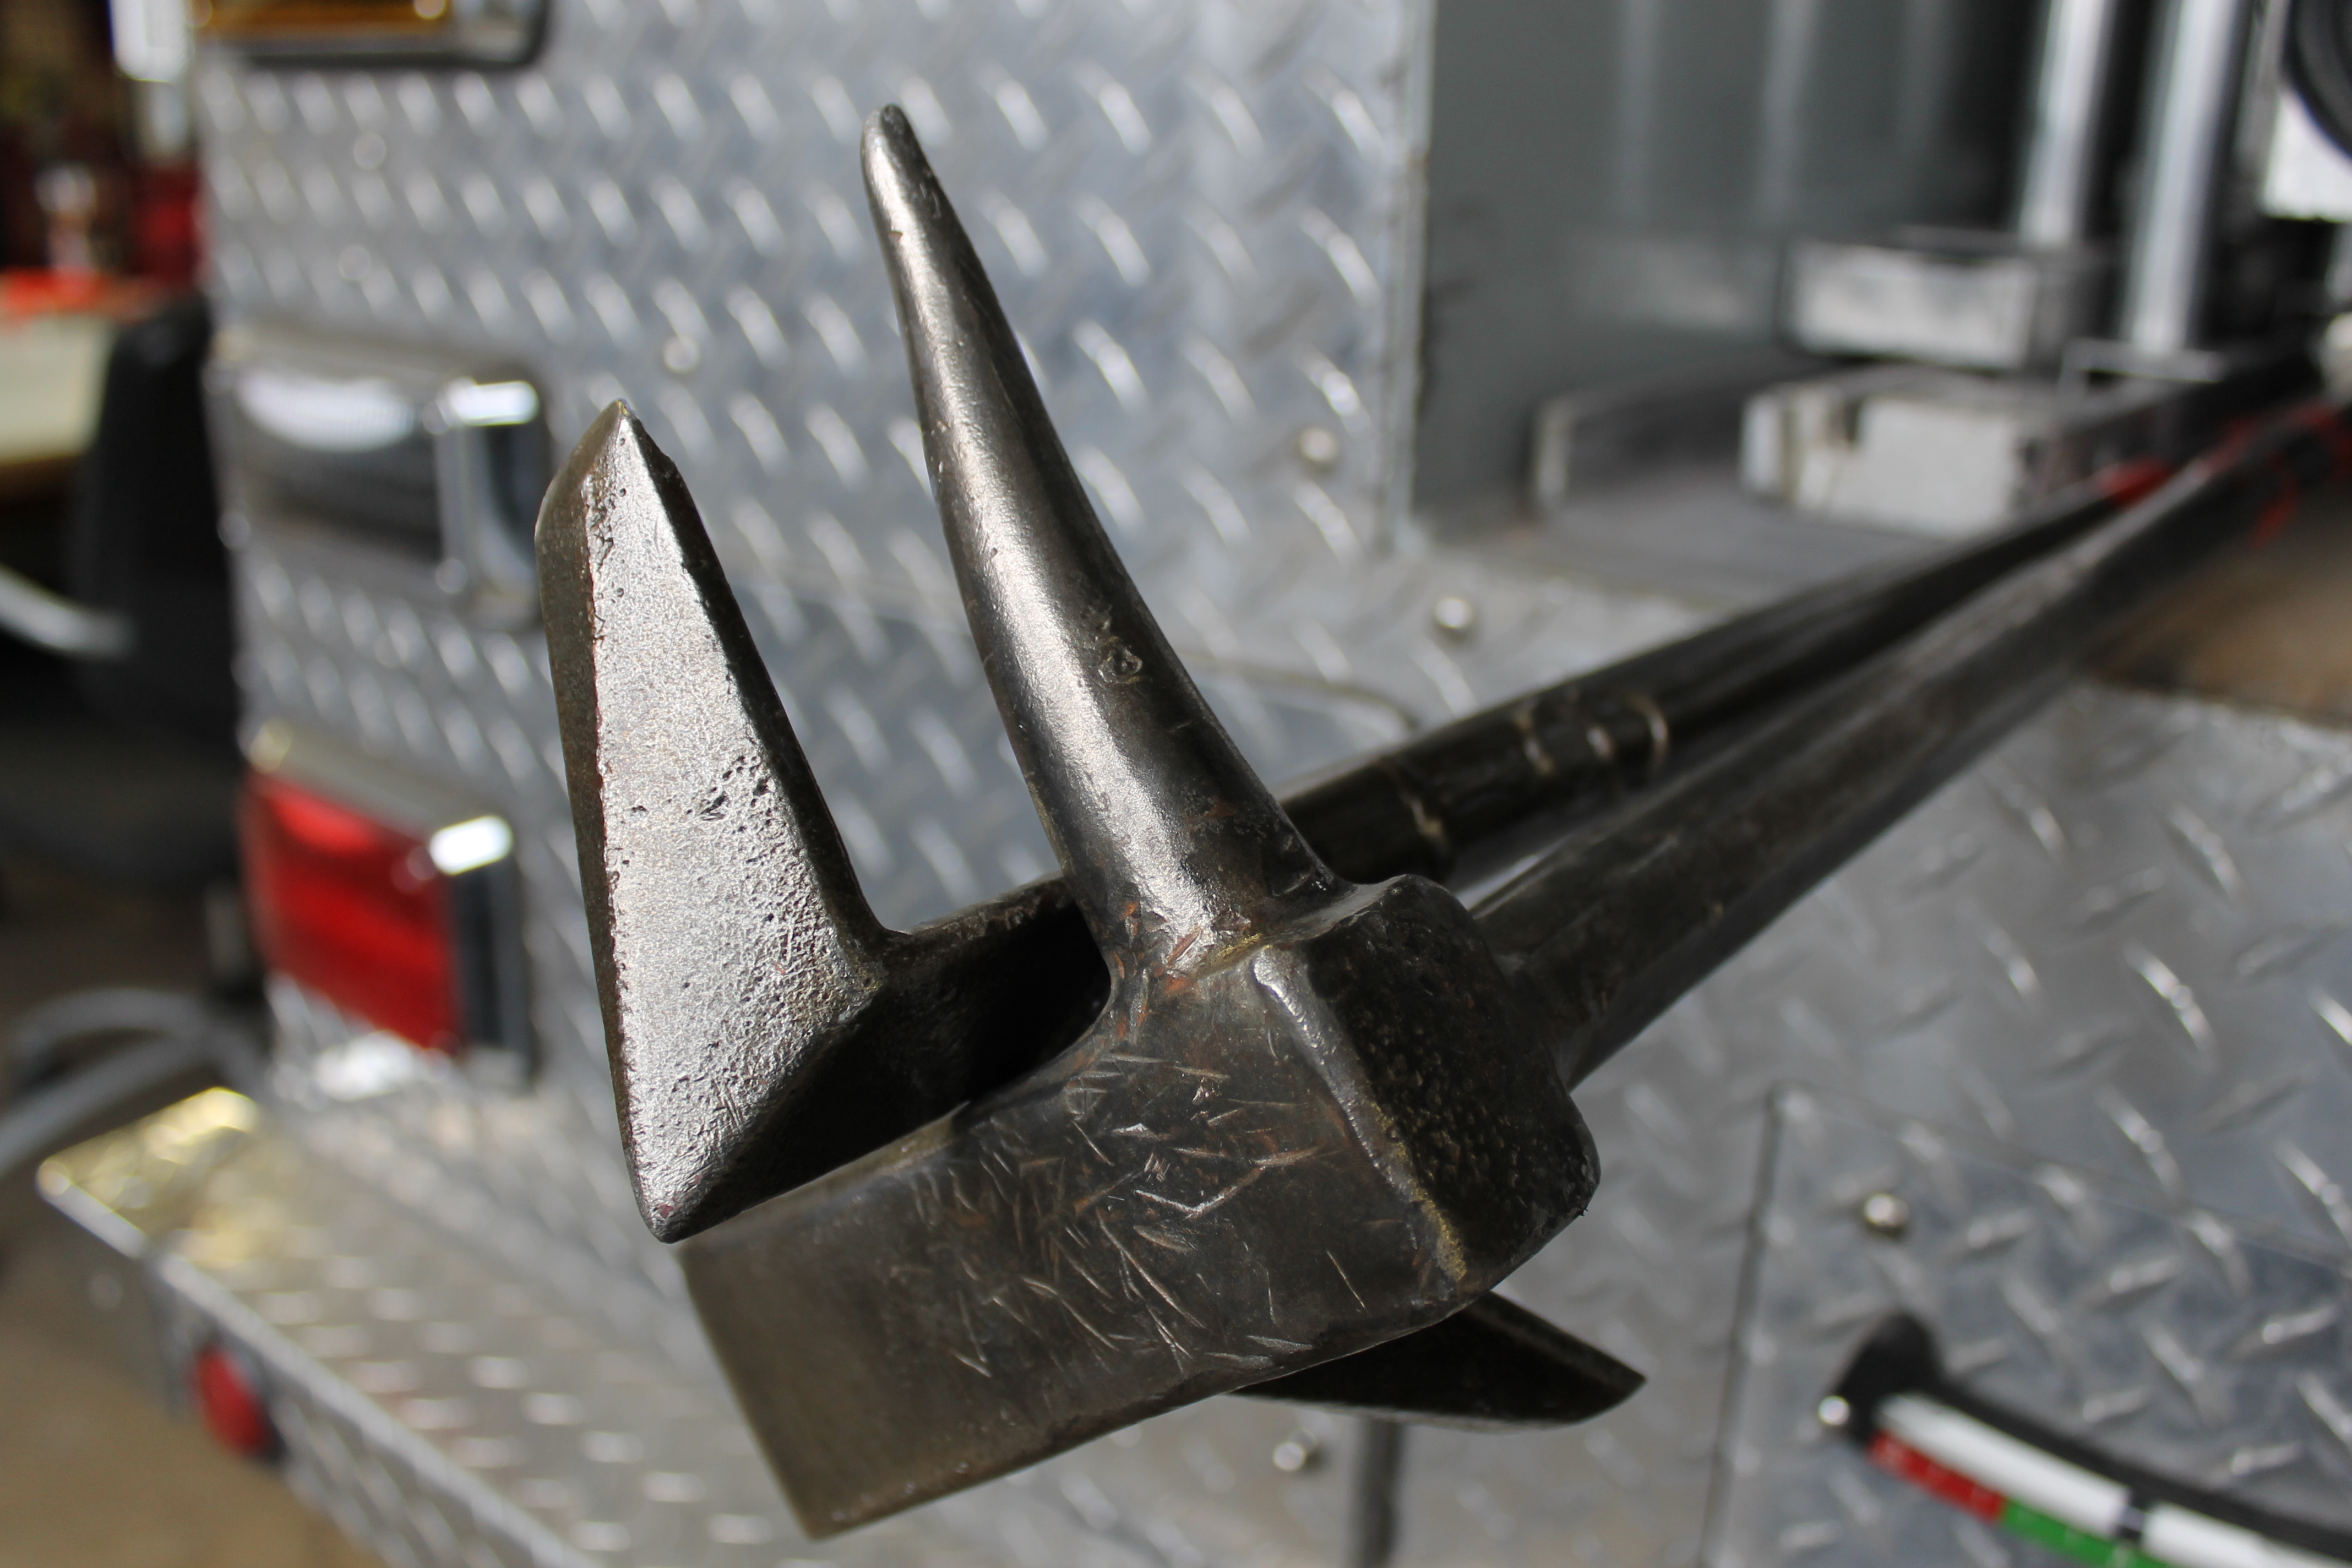
The halligan is 30” in overall length.

photo

The forks are 6” and the crotch is 5”.

photo

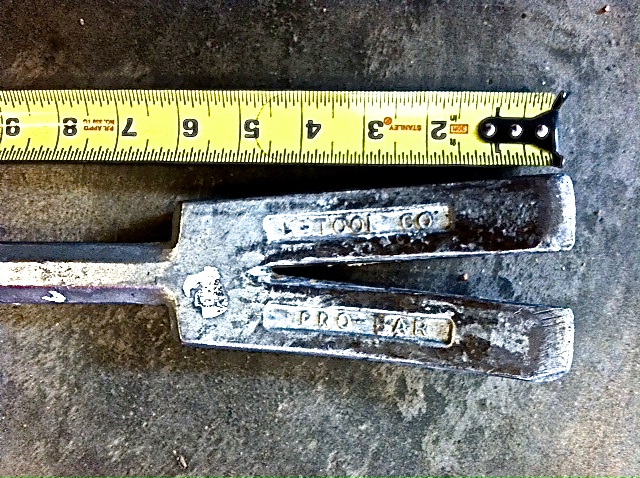
The adze is 6” in length.

photo

The adze is 2” wide.

photo

The pick is 6” in length.

photo

The adze/ pick triangle is 5” tall.

photo

With those numbers in mind we have most of what we need to determine how much MA we create in different positions on the door, as you will see below.

Outward Swing Doors (Towards you)

Screen Shot 2015-03-12 at 11.43.54 PM

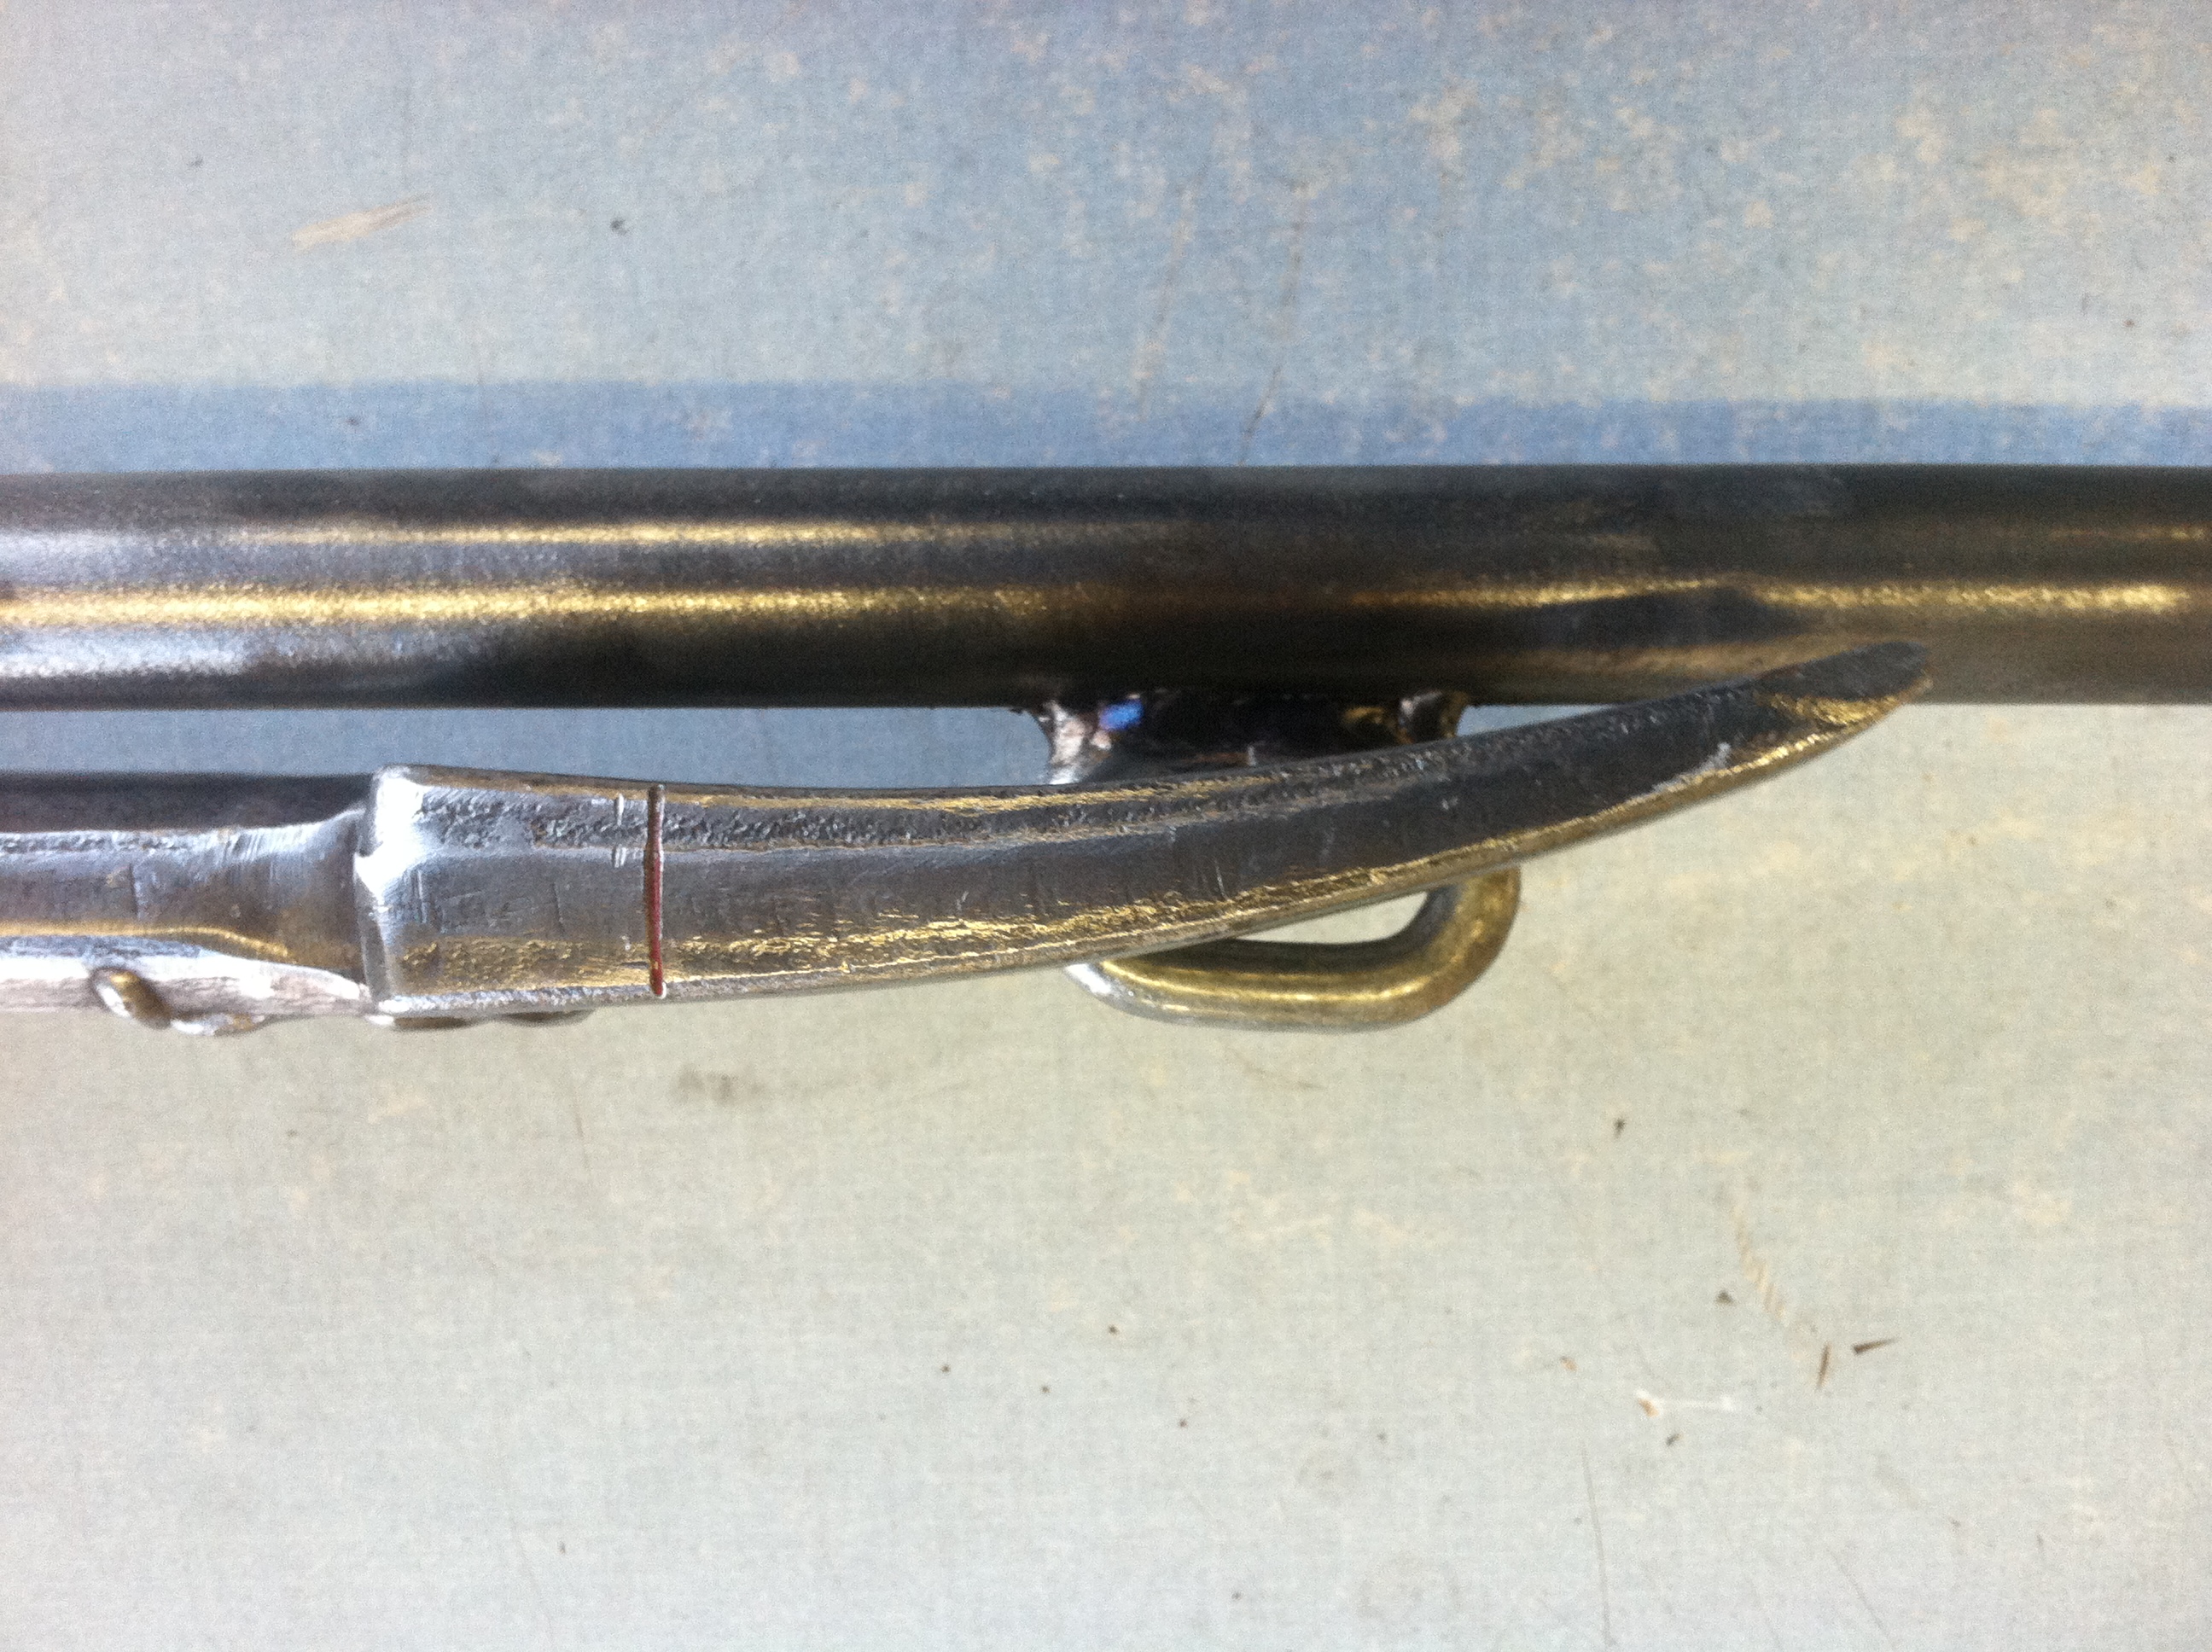
It is often advantageous to gap, crush, tunnel, etc. an outward swinging door to assist in setting the adze.  By placing the halligan in such a fashion (disregard hand position and how low on the door the halligan is placed) and moving the bar up and down we are using 30” of the bar from the fulcrum and the door is being impacted by the edge of the adze, which is 2” from the fulcrum.  Therefore, we create a 15:1 MA (a lot of force!)

Screen Shot 2015-03-12 at 11.21.06 PM

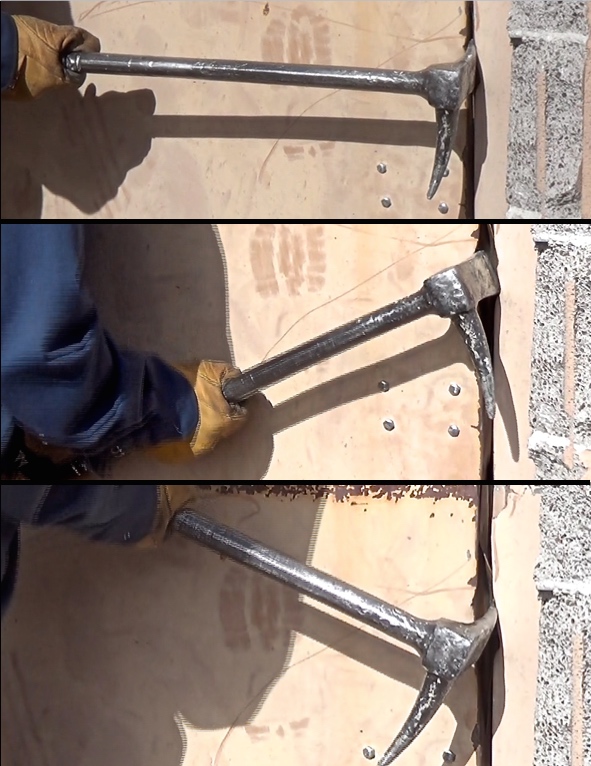
Once the door is gapped, we can either drive the adze in and set it or we can drive the forks in.  I’ve heard numerous arguments for and against both methods, and that is a whole topic in itself, so for now I’ll just stick with the MA examples of each.Screen Shot 2015-04-23 at 5.31.34 PM

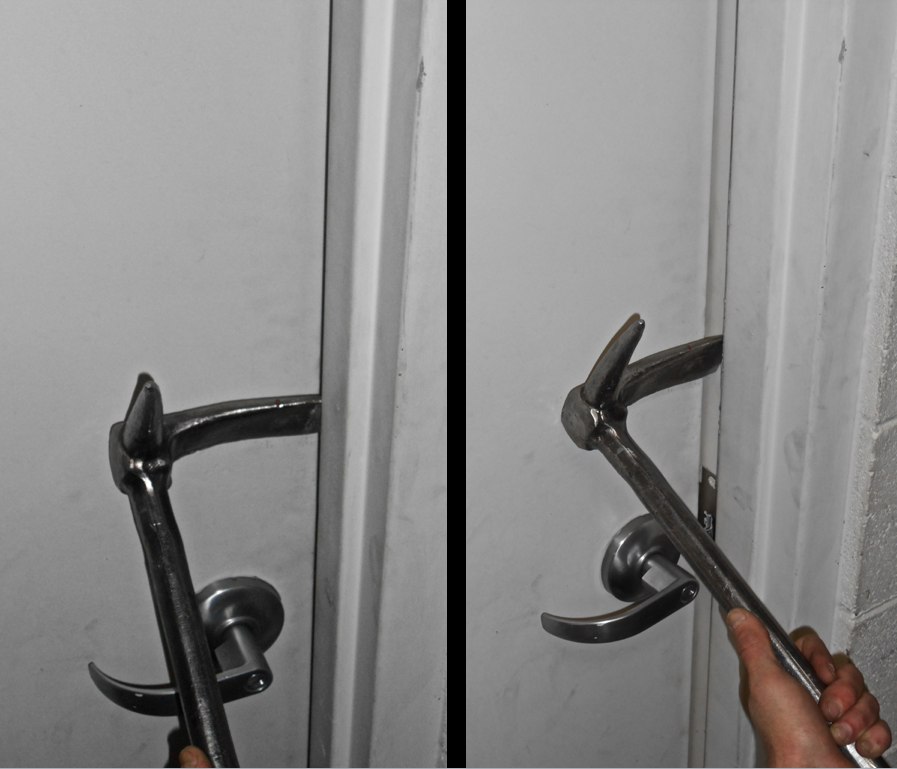
(Door removed for picture purposes)

In this fashion, we see the adze driven to its “mark” that lets us know we’ve driven far enough to clear the jamb and catch the door effectively.  This puts 4” of adze past the outside edge of the door frame.  That frame edge is our fulcrum.  You’ll notice that where the jamb or rabbit is located is at the 2” mark, representing where the inside door edge would be located (the load).  This equals 2” of distance from the load to the fulcrum.  Once again the distance from the force to the fulcrum is 30”, giving us a 15:1 MA.

Screen Shot 2015-04-23 at 5.48.58 PM

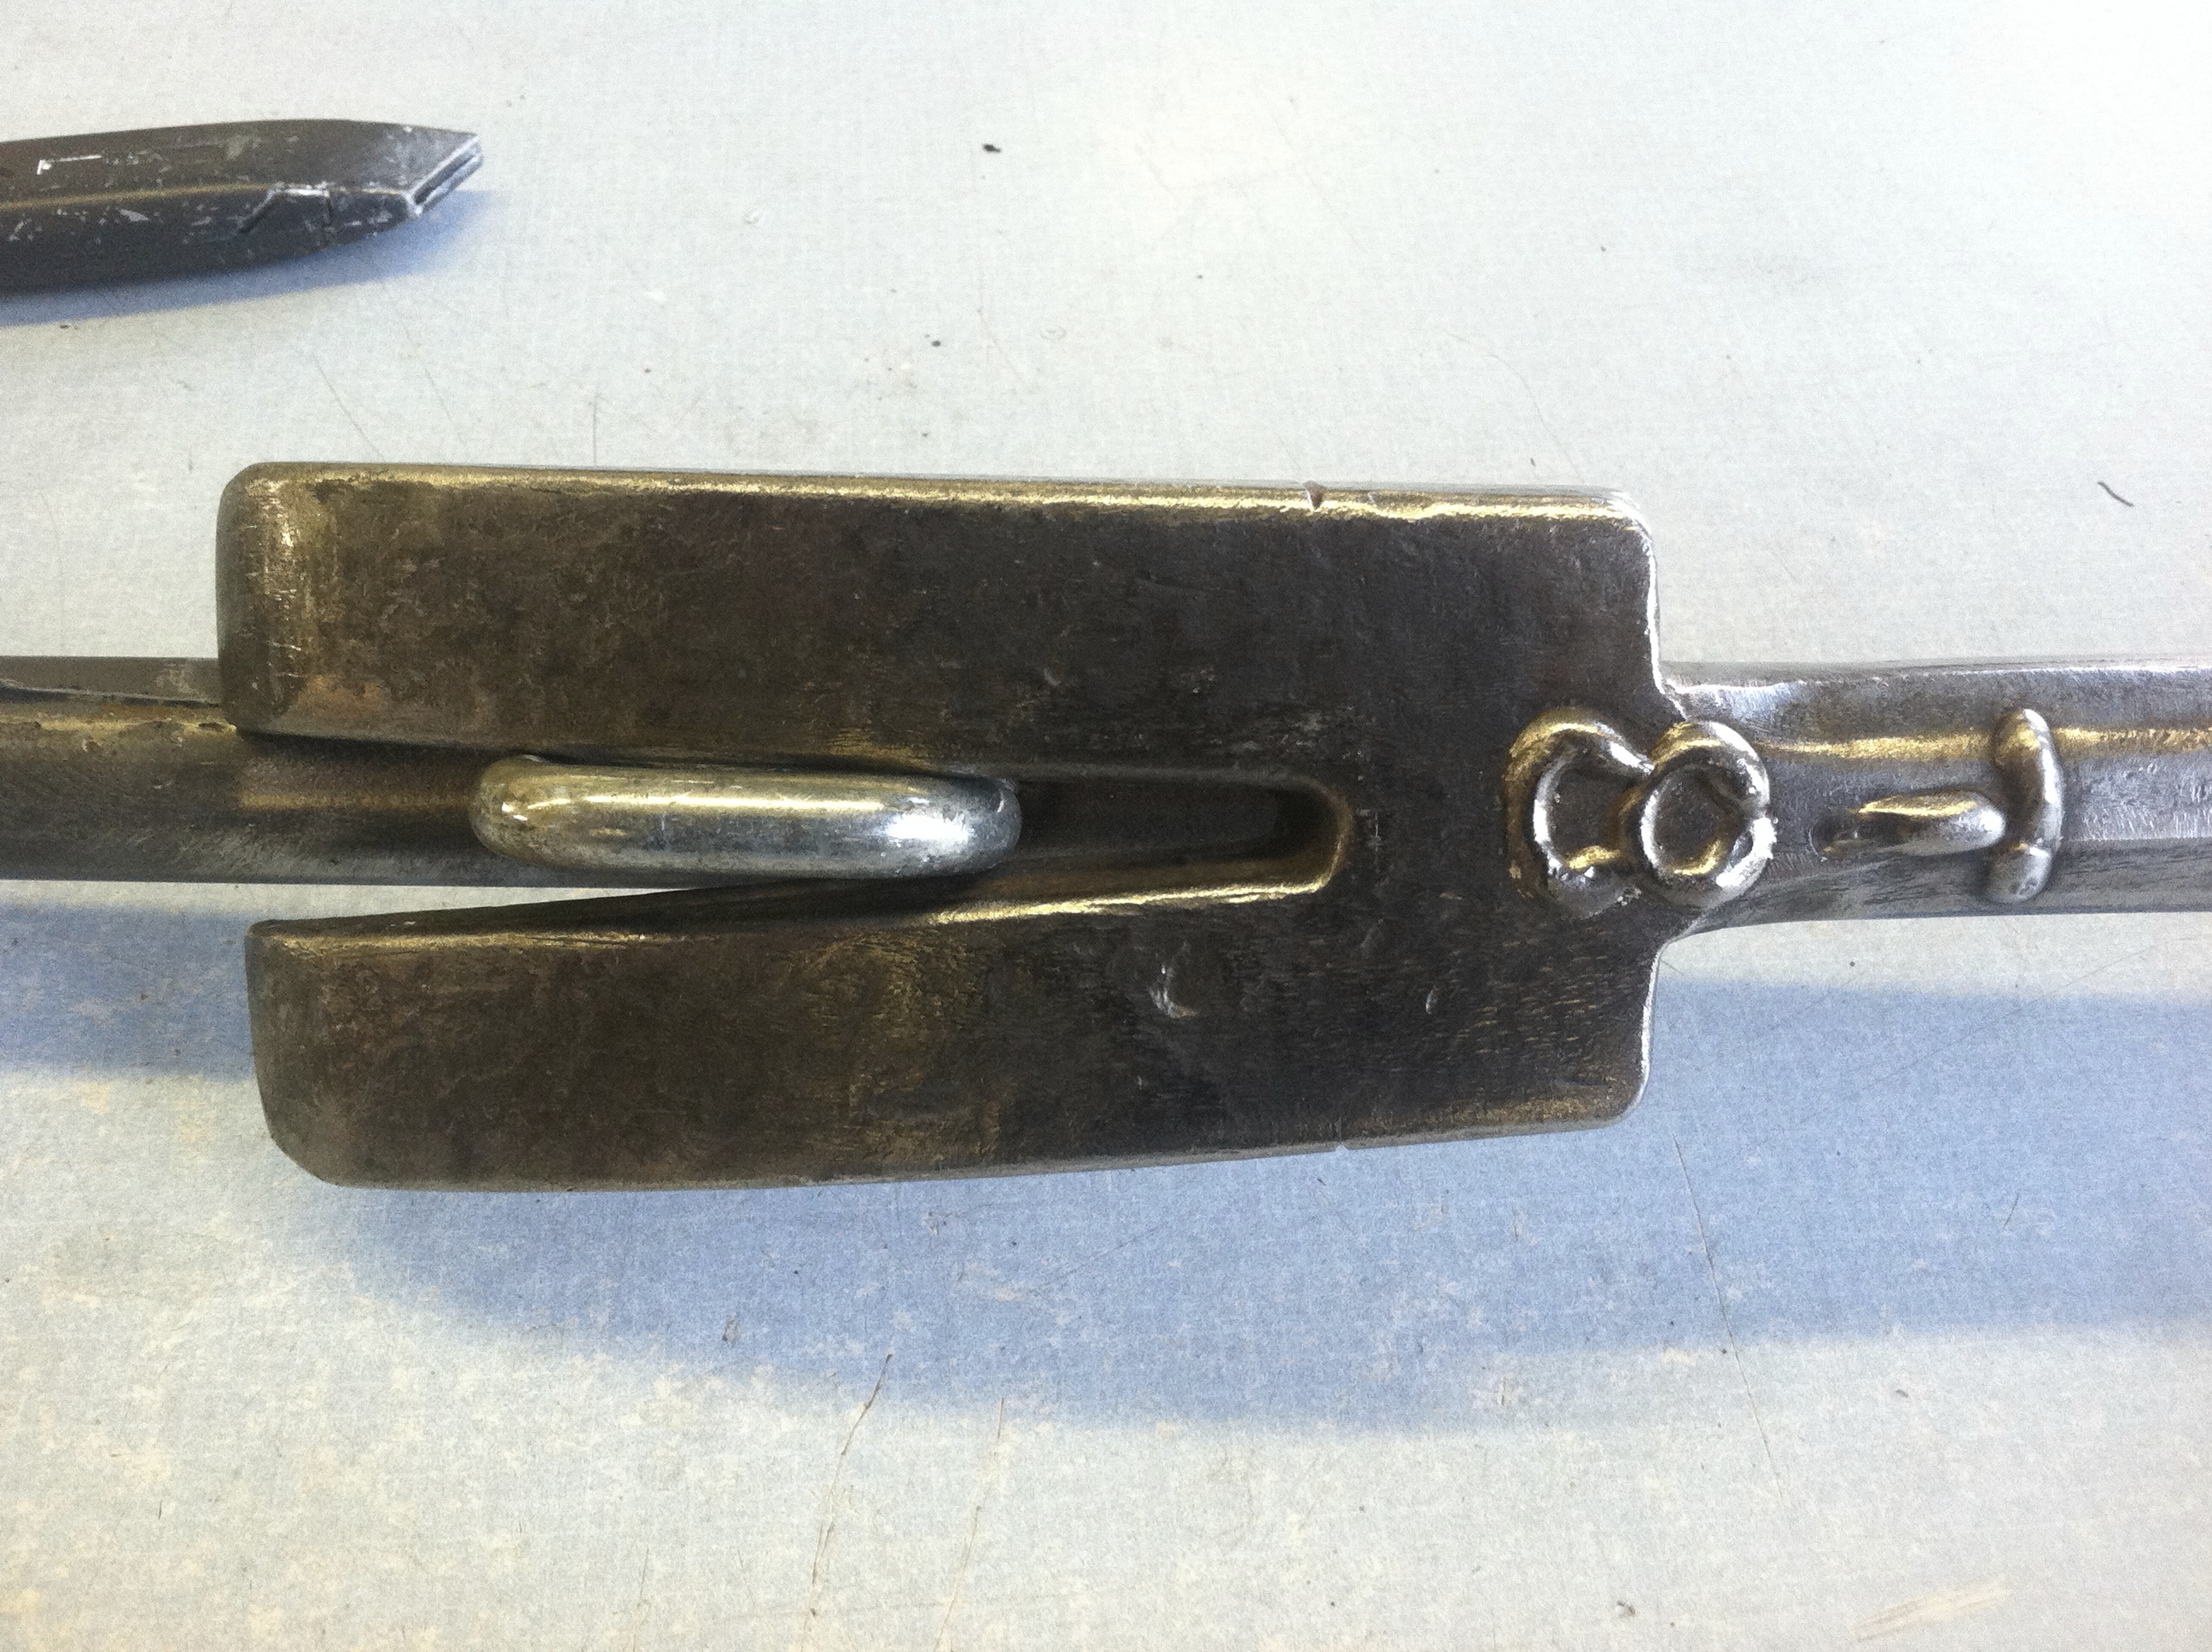
Here we have placed the forks for the outward swinging door.  Once again, there could be a entire discussion devoted to bevel away or towards a door in forcible entry, but we’re just sticking to MA for now.  Note that the fulcrum (outside edge of door frame) is created at about the 3.5” mark.  The jamb is located at the 1.5” mark.  Once again our load to fulcrum distance is 2”.  However, in the forks configuration, we lose a bit of MA, because our force to fulcrum distance is reduced by the length of fork  we drive past the fulcrum, in this case that is 3.5”.  Therefore we end up with 30” bar minus 3.5” for a force to fulcrum length of 26.5”.  So our MA is 26.5 / 2, which equals 13.25:1, still significant, but reduced from the adze application.  What’s important to note is that if we had driven the forks to the crotch mark, as is often taught, we reduce our MA to 25/2, or 12.5:1.  I know the concept of driving the forks to the crotch is to assure that you have cleared the jamb and have enough fork to grab the door, but it is obvious from this picture that those concerns are addressed with a shallower drive.  It’s something to think about.

Inward Swinging Doors (Away from you)

Screen Shot 2015-04-23 at 5.54.23 PM

Here we see the set up to initially gap (and possibly force) the inward swinging door.  The halligan is used in the same fashion as gapping the outward swinging door, just in a different position.  By pushing down on the bar and forks we create a fulcrum on the edge of the 2” wide adze, therefore, the math doesn’t change and we have a 15:1 MA.  It’s important to realize that pulling up in this configuration (right side opening door)  greatly decreases your MA due to the length of the pick.

Screen Shot 2015-04-23 at 6.08.01 PM

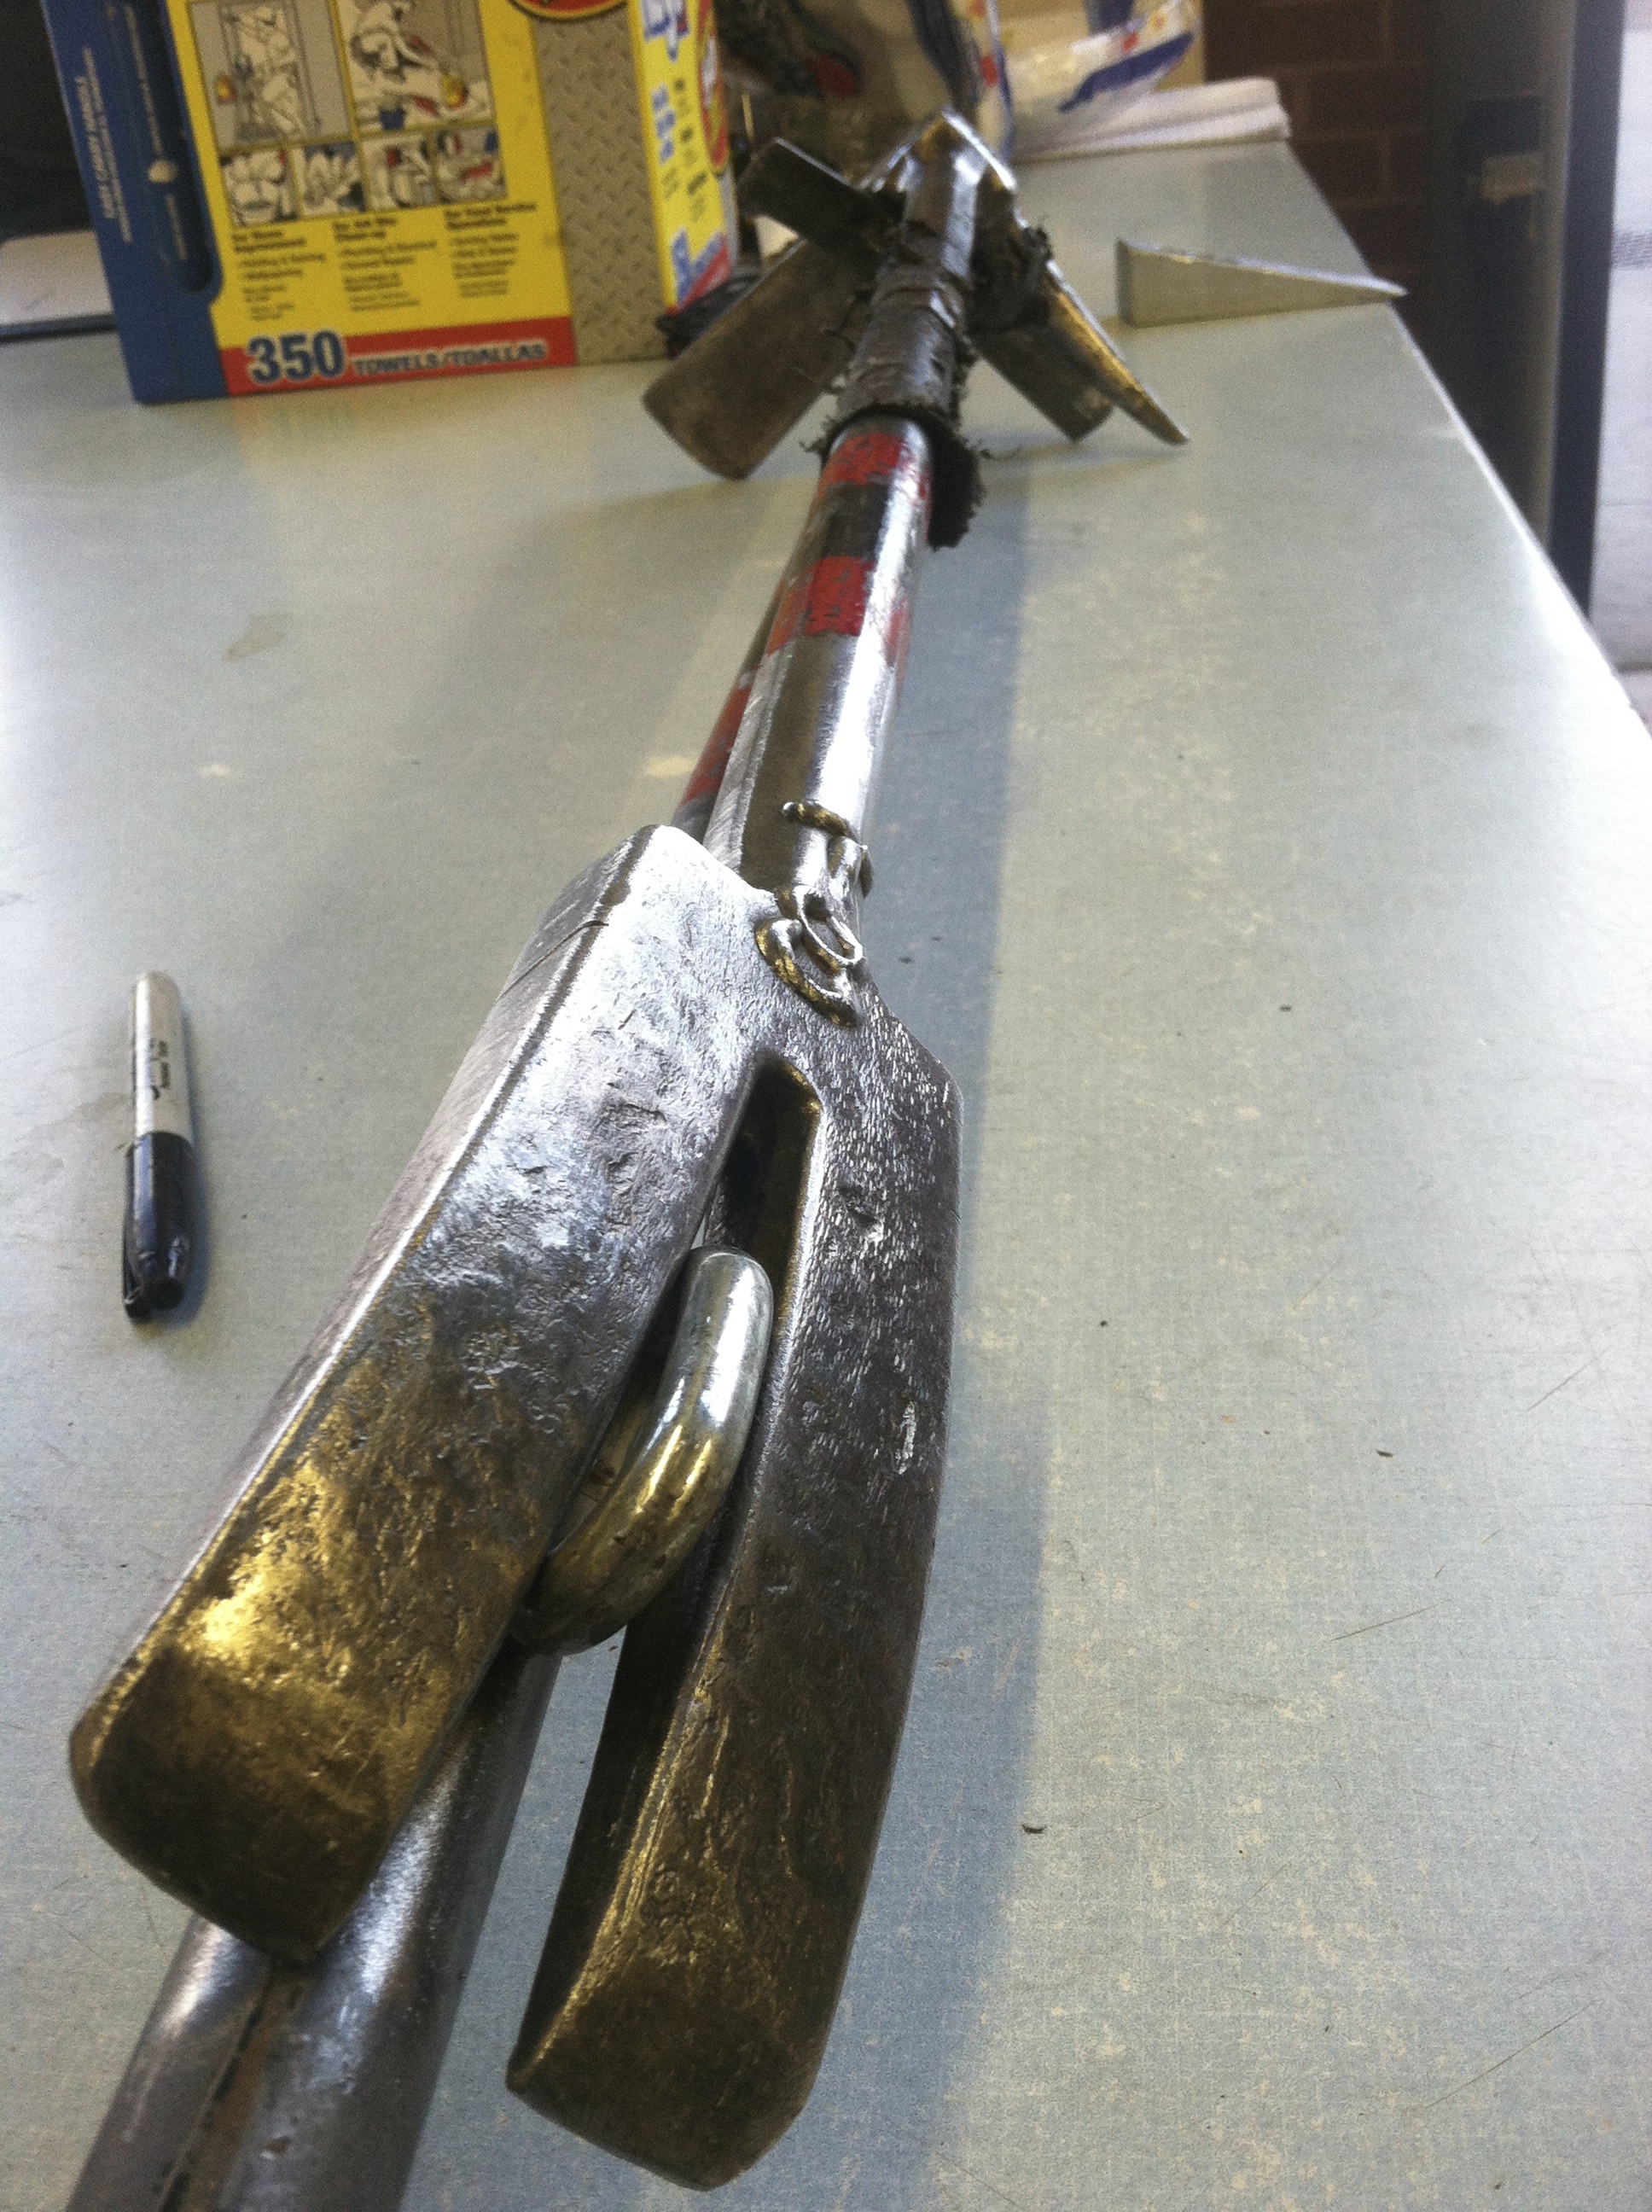
Up until now, the halligan has been used in the class I lever mode.  Here we find it used in the class II mode.  In this set up, we have driven the forks to the crotch mark.  This creates our fulcrum at the edge of the door frame at the 3” mark and puts our load at the jamb at the 5” mark, once again, giving us a load to fulcrum length of 2”.  Because we have driven our forks 3” past our door frame edge (fulcrum), we have also reduced our force to fulcrum length by 3”, resulting in a D(f) of 27”.  Therefore our MA is 27 / 2, or 13.5:1.  Once again, I know it is often taught to drive to the crotch, but remember, the deeper we drive the forks, the less MA we have available to us.

I’m sure with the 90 degree bend in a halligan bar and the curve of the forks that there are some really fancy equations to truly figure out the exact MAs for the halligan.  So, if you’re not entirely thrilled with the numbers as fact, consider them arbitrary values and simply think of the different configurations as “more” or “less” MA.  The key is to have a good grasp on the capabilities of the tool.  And don’t forget, in order to achieve the greatest mechanical advantage you have to maximize the force to fulcrum distance, meaning you must pull or push at the end of the halligan.  The closer you move to the door, the less MA you realize.  With that said, remember that you can increase your force to fulcrum distance, therefore increasing your MA, by introducing a roof hook into the mix or marrying up another halligan at the forks.  Finally, like most things in life, there is a trade-off involved.  The greater your MA, the shorter your “throw” when forcing a door and vice versa.

(Editor Conclusion)

I first saw this “ballpark mechanical advantage explanation” from Josh Materi while he was explaining Halligan use in a hands on forcible entry drill (video below). Josh does a good job explaining a couple of other ways we commonly use the tool that is not included in the numbers above. What you have to keep in mind is as you force a door and material starts moving, fulcrums change and so does the point of the tool that is prying on the door. This is what makes this rough math and a constantly changing mechanical advantage but you get the picture.  Josh breaks down the adze end of the tool into three major categories (the 2″ adze, the 6″ adze and the pike/adze combo) This is the easiest way I have found to keep it simple when instructing which part means what when we put it to work on a door. Thanks a ton to Ben Shultz for writing this article and Josh Materi for permission to use his video clip. -Royal

Marriage Invitation: Hook and Halligan

11/29/2014

You are cordially invited to make your outside vent tools more user friendly and efficient. The Halligan and 6′ hook has long been the baseline set of tools for the outside vent position. In my fire department the OV position is the “ladders firefighter” (FF sitting behind the driver). This position has a large amount of duties to accomplish when arriving as a first due truck. The driver is the other part of this two person team but we routinely operate by ourselves around the outside of the building performing similar duties. The only time we strictly operate together is during vertical ventilation or during vent enter search. The ladders firefighter will be laddering above grade windows, removing window bars, forcing the c-side door for egress, and performing a horizontal vent when needed.

This gives you a general idea of how that seat works for us and why this position carries a certain tool compliment. When I am riding Ladders I carry a Pig in my belt, with a 6’hook married to a Halligan. The tool in my belt along with the Halligan married to the 6′ hook allows for maximum efficiency because I still have a free hand to bring ladders to the building each time I walk to the truck. I think it is poor practice as an outside vent firefighter to only carry a hook and then have to return to the truck for a Halligan to force the c-side door or remove stubborn window bars. Both which are critical duties that should be accomplished in the first few minutes of our members operating interior.

Here’s the solution for us, and by no means did I invent this. Companies all over the country have been utilizing chain links to marry their hook and Halligan long before I was even in the fire service. I  get a lot of questions and emails about this concept and hope I can make a few peoples jobs a little easier.

It’s a simple fix and we have used it on several hooks for many years. By welding a chain link at the appropriate height on the hook it allows you to put the forks of the Halligan over the chain link, then squeeze the tools and slam the base of the hook on the ground. It will cause the forks to bite into the chain link and creates a very tight bond with the tools.

IMG_4853 - Version 2

IMG_2734

IMG_2733

IMG_2732

This creates a very easy one hand carry of the tools and reduces hand fatigue. If you currently don’t have these tools married you know that you have to keep a tight grip on them and it is not uncommon for the tools to separate half way to your target. This will be eliminated with the chain link. The bond is tight enough that once you get to your location you very rarely can pull them apart by hand. If I am on concrete or asphalt I will just throw the tools on the ground while I throw my ladder. The impact on the ground will separate them. The other option is to flip them upside down like the photo below and bump the head of the roof hook on hard ground or against the foundation of the house, etc. This will also easily separate them.

IMG_2735

There is no set measurement for the chain link that I can give you. This article is obviously on a Pro Bar, but it is going to vary by the brand of Halligan. There are Halligans out there that this will not work with. If you are using a Pro Bar there is some variances on this measurement based on the age of the Pro Bar. I like to make this chain so that all of them will marry up regardless of age.

To get your spacing right, marry up the Halligan with the hook in one hand and slide your chain link in between the forks with the other hand. If the Halligan is pulled down flush to the hook now is the time to give it some space. Your goal is to leave some space between the bottom of the adze where it will touch the top of the hook. The picture below is taken with the Halligan just lightly sitting on the top of the chain. If you leave about a 1/2 inch where that dirty fat finger is, you will end up with enough room to give a nice solid bite on the chain link when you slam the base on the ground.

IMG_6268

If you don’t leave enough space the Halligan will bounce off the top of the hook before you ever get a bite. If you are unsure of this, lean towards a little too much space rather than too little. Too much space will still marry the tools together when you bite the chain, even if there is a left over space between the tools. Too little will cause the Halligan to bounce off the hook before it sets properly.

IMG_6272

The picture above is after the tool has been slammed on the ground and the Halligan bites the chain. You can see the nice tight fit between the tool heads. Once you find the spacing for your Halligan, make a mark on the chain link and a mark on the roof hook.

IMG_2729

Once you have your mark, just use a small tack weld to hold the link to the hook, now put the Halligan back on and just dry fit your mark. Don’t slam the tool down, but see if you like your spacing. If it looks good, run a bead and call it good. I have never had one of these links fail or cause the hook to weaken or bend in any way, shape or form.

IMG_5523

Now you have yourself a set of combat ready outside vent tools. I slide mine in the slot at the bottom left of this ladder compartment, they’re married together and pull out very clean and quick. I pull my tools, then select my ladder and I am ready to move within seconds (no extra fumbling around or assembly required!)

IMG_1016

IMG_6266

IMG_1022

Kicking Doors 101

04/13/2014

A quick thought on kicking doors. We teach not to do it. Not because it won’t open doors, because  honestly it will open a lot of them. I am not trying to kid anyone and say that we have not kicked open residential doors before. But I will say when I was still kicking doors open it is because I didn’t properly understand how to use a Halligan bar. So kicking was the easiest way for me to open an apartment door that was on fire. After I gained some experience, learned my way around a set of Irons and really thought about when and when not to kick a door, it became real clear to me that because I was now properly trained on a Halligan bar (and I carry it), there was no reason for me to kick doors open. They can be opened just as fast with a competent person on the tool. The other thing I noticed was kicking doors was wasted experience, it was a perfect opportunity to hone your skills with the Irons on a real door in a real frame. Thus building your confidence and not letting all of your experience be based on a forcible entry prop. Lastly, when luck runs out, because at some point it will, a person who is competent on their Irons now has multiple options and is very proficient in them because they have been forcing doors with the Irons for most of their career instead of kicking them for 15 years. Attacking doors based on knowledge rather then luck will give you a much stronger foundation when it’s time to force the doors that are out of the ordinary. You will find doors you cannot kick, and when you do, and the luck of kicking runs out, you will set the tone for the fire ground with a real bad forcible entry situation. To many people are relying on us to base our operations on luck.  Long live skillful Irons work!

These doors are all out of occupied residential homes.

KickingDoors

Overcoming The Wall On Recessed Doors

11/12/2013

By B. Brush and R. Royal

Commercial outward swinging doors can be some of the most difficult forcible entry situations due to the locking systems and added fortification but what is often overlooked in training is access challenges.

This outward swinging  door on the back of a commercial building has a half wall on the hinge side and the jamb side is recessed in the masonry block. While few would consider the “confined space FE” it still limits our working area. The half wall may prevent the use of a married hook here and the recessed jamb limits the prying ability of our adze.

Image 1

You can see that the Halligan is going to max out before we even use half of our full prying range of this bar, this could easily prevent us from getting enough leverage to force the door.

Image 2

The upside to this situation is that end of row bricks and block are very weak points and can be blown out easily with a strike to the corner with the flat head creating ample room for a full force.

Image 8

You can now return to your Halligan and properly set the tool all the way behind the door. When you pry outwards you will have the full range of motion and gain the maximum amount of pry and throw from your Halligan.

Image 5

This can be difficult to fully explain and see the advantage of this tactic in photos. Below is a quick video showing how effective crushing the block can be.

Imitation Halligans…A Setup For Failure.

12/05/2011

This is a problem, a big problem. We have been spreading the word for quite a while now, about the downfalls of the different types of Halligans. The picture above happened yesterday, adding more credibility to the argument. This is not the first one on my FD that has broken, but it is the first one I have been around. These imitation tools breaking is not that rare of an event. My email has been filling up with guys from all over the country sending me pictures and stories regarding these tools breaking in similar fashions.

Here was the situation, the squad guys from my firehouse responded to an alarm and found that they needed to force entry into a house to access the person inside. They decided the need to get in did not require conventional forcible entry right away, so they went with the Rex Tool and did a great job going through-the-lock on both a key in the knob and a typical deadbolt. Their technique was great and was low impact enough that both locks were manipulated, but were still in working condition. This is a common practice for us to gain entry on medical or service call type situation on houses or apartments, most of the time we can lock everything back up (along with the homeowners keys still working) and you can barely tell we were inside.

The problem came after both locks had been tripped, the door still had resistance.  After recognizing that the door had a secondary device they moved to conventional Irons work and discovered that they had a 2×4 drop bar with fairly weak steel mounts on the backside of the inward swinging door. Not a big deal for them to overcome, but one of the variables that you don’t find on most single family homes. As they drove the tool in trying to set the forks to the proper depth, one of the axe blows broke the entire adze end of the tool off. They now had a little more challenging situation, they were still going to get the job done with what they had, this required them to strike the now exposed shaft of the tool to drive the bar rest of the way in. That takes a lot more trust of your striking guy when he’s swinging at a 1 inch piece of steel rod that you are holding! They overcame and forced the door with little difficulty after that.  Well done fellas.

Where the real problem lies is that a hand tool, made for the fire service, could be constructed and accepted at this level of quality. These bars are made of three different pieces, attached with a pin on each end to hold the working heads on or in the picture above circular welds all the way around the bar. It is a widespread problem across the country that these types of Halligans are put on front line rigs. What is the worst part? Its not for financial reasons, it usually a lack of attention to detail when ordering tools. You can buy a high quality bar that is made out of ONE PIECE FORGED STEEL for basically the same price as these imitations.  This is the meat and potatoes of our tool compliments, they should be made to work, work hard, and work with a very small likelihood of failure. They are pry bars!!! Who designs a pry bar that has the working end made out of separate pieces? The exact spot on the tool that has hundreds of pounds of leverage being applied to it!! It shouldn’t take a mechanical engineer to figure that one out.

The fire service is full of gimmicks, go to any fire equipment related web sites and you will see that a good portion of the tools and equipment that are marketed to us these days are only made to make money. Trust me, they would not continue to make all of these gimmicks if they were not being purchased by a large majority of us across the nation. You have to evaluate every tool and ask yourself “Is it a gimmick or not”? Most hand tools that come with 14 features and can turn off gas, turn on O2 bottles, pull a nail, cut drywall, then open sheet metal like a can opener, all while being a rope anchor should raise some red flags to us. I am not for one-second trying to say there has not been some amazing developments in our hand tools over the years, I am saying that the tools that have been around before all the gimmicks are still doing the job better than any multi-tool.  Axes, Halligans, Hooks, Hose, Rope and Wooden Chocks, it is hard to put something up against those time tested tools.

I use Pro-Bar Halligans plain and simple. Are they the only good bar out there? I highly doubt it, in fact I know of a couple others that I would love to test out and some guys would vouch for 100% (Aazel Tool Co. is one of the good Halligans in particular that I think would compete). That’s not what my experience has been with, so I will not speak to those. 30 inchPro Bars have superior construction, have a great amount of thought into the thicknesses, curves and designs of its working ends and have been proven on the fire ground for many years. I have already wrote an entire article on the differences of the Halligans found on the market. Please take a look at it here, it gives you all the information you need to compare the 3 Piece Bars v.s One Piece Pro Bars.  Here is the article Halligan Bars, They Are Not The Same

We have made the change in my FD and are now purchasing 30″ Pro Bar Halligans, it is encouraging progress and they have successfully been phasing out these other bars. Our work does not end there, we have to spread the knowledge and information about the differences in these tools, its the only way to make an impact. The proper information has to reach enough people on your own departments to create awareness on this topic. I do not represent Pro Bar or Fire Hooks Unlimited in any way, I will not make any money off of this next part, nor am I trying to pull some type of stunt to get more web traffic to our site. I am simply asking you, whoever is reading this today, to pass this on and let others see the differences in these tools. Last night when I posted that picture it went to over 5000 people in a matter of an hour or two. That didn’t happen because of my post, that happened because many of you thought it was worth talking about. It is the only way we will ever make a difference with what we will accept as properly made tools. Most of the comments reflected on how widespread this problem is. I am asking those guys out there that read this website and have very large blogs, websites, Facebook pages, Twitter accounts, etc, to please give me a hand on this one.  You are the ones that can make a difference, not me on this small website in my own little corner of the Fire Service world. So if you believe in the message of this post, and want to help spread this information please share it with others.

Bevel to the Door vs. Bevel to the Jamb

04/05/2010

Bevel to the door or bevel to the jamb?…..that is the question. The main intention of this article is to compare the differences in the two ways the fork end of the Halligan can be used on inward swinging doors. Both ways can be used  with very effective results, but knowing why we choose to use one way or the other is important. They both have advantages and disadvantages, but as long as we recognize these advantages and use them in conjunction with each other it makes for a great combination. For clarification we refer to the bevel as the outside of the curve, it will be much clearer when looking at the pictures. This comparison applies to Pro Bar Halligans, although some of the info will pertain to other bars, it is written based of the use of the Pro Bars.

After we obtain a proper gap of the door(  based on wood or metal jambs) we must move to our fork and choose to either place the bevel to the jamb (as seen below) or bevel to the door. First we will cover bevel to the jamb. Bevel to the jamb allows us a few advantages when setting the tool to the proper depth. As you can see below the angle of the fork wants to naturally guide itself around the door. Because of this angle it leaves us with much less resistence on a metal frame, and it also helps prevent us from sinking the teeth into a wood jamb. While guiding our bar away from the door while it is being struck we keep the fork moving smoothly around the door. Our disadvantages come after we have the tool set and we are ready to force. This will be discussed below. The next two pictures show the fork being set with the bevel to the jamb.

Next we have Halligan being set with the bevel towards the door. This is probably the most common way setting a Halligan is taught, which is fine as long as we know the potential problems we have to overcome. You can see the curve of the tool is wanting to guide the forks into the frame. This can cause us to feel more resistence when it is hitting a metal frame, or creates much more of an oppurtunity to drive the forks into the jamb if it is wood. The Halligan firefighter has to pay complete attention to guiding the forks in to prevent us from hanging up on the frame. Solid pressure on the tool away from the door as it is being driven is a must to allow it to sink easily to the proper depth.  This is the disadvantage of setting the tool with the bevel to the door but the advantages come later. The next two pictures show the halligan being set with the bevel to the door.


If we haven’t lost you to boredom yet, we can now see the remaining advantages and disadvantages. As you see below we are back on the bevel to the jamb. As stated above the bevel to the jamb is easier to set and guide around the door to the proper depth. Where the disadvantage comes in is when we apply the force. The picture below is showing the Halligan applying full force. You can see that the gap it has created is relatively minimal. This is because we are not using the designed leverage point of the Halligan and we have also gone against the design of the forks. This still does not mean this way is wrong because many times this is all the leverage we are going to need, however we need to remember that the Halligan provides more leverage in other ways if it is needed.

The last picture(above) shows us bevel to the door being used. If you scroll back and forth between this picture and the one above it you can see the difference in the gap. We stated earlier that the bevel to the door can be more difficult to set if the door is tight, but as you can see when the bar is set it applies much more leverage. When the bevel is placed to the door it uses the characteristics of the tool to their full potential leverage. The forks grab hold of the backside of the frame and the high point of the bevel is being pushed against the door.

In summary neither way is right or wrong as long as you know why you are placing the bevel the way you choose. Different doors, jambs, and lock setups will call for different ways to put the bevel. A metal frame and metal door that is secured very tightly may call for the bevel to the jamb so that you can set it easier. However if we choose bevel to the jamb and don’t get the leverage we need, we can put a chock in the door or an axe and hold the gap we made. We can then pull the Halligan out and reverse the bevel and continue applying force with the bevel to the door.

This can go on and on, but it is only intended to illustrate the major differences in how you place the bevel. We know this is getting technical, but practicing the different ways regularly makes it become second nature on which way to place it. Again this is just another back to the basics post, nothing new, nothing that we invented. Just passing on great technique tips that has been passed on to us.  After this long-winded writeup there is really a simple way to sum it all up:

Bevel To the Jamb= Easier to set, Less leverage to force

Bevel To The Door= Harder to set, More leverage to force


Door Size Up #3

01/17/2010

Door #3 is found on the backside of a 2 story commercial building. The front side consists of storefronts on the first floor with offices on the second floor accessed by a common stairwell. Attention to detail while sizing up this door may just make the difference in how we would attack it. Hit our key size up points, take a guess on the exterior picture and then scroll down to see if you were right.

Key points to identify for door size up:                                           

–          Building Occupancy

–          Construction Type (mainly the wall around door)

–          Which way the door swings

–          Type of door material 

–          Type of frame and jamb

–          Locking devices and Bolt patterns (additional security devices)

Exterior of Door # 3


Interior of Door #3

The interior picture makes it clear why the offset bolts are mounted as seen. This homemade multi-lock has a single handle in the center that slides the flat throws into place on each side of the frame. The throws sit  into the jamb and are then pinned behind the mount. This would prevent someone from reaching through a cut hole in the door and activating the handle. Another option found on this type of lock uses padlocks in place of pins.

The most common type of multi-lock in this area are the homemade ones as seen above. The commercially sold Fox Locks that activate in the same manner are uncommon in this part of the country. A big difference in these homemade multi-locks and the commercially sold ones is the access from the outside. Most multi-locks that are commercially made have the option of a key cylinder on the outside that allows you to activate the lock (which gives us the option of thru-the-lock), very rarely does a homemade multi-lock have this option.

Here is the breakdown of our size up:

1. The common door knob showing (key in the knob) tells us that we have very little resistence in our primary lock and that this door does not have panic hardware.

2. The offset carriage bolts should alert us of a possible multi-lock instead of a drop bar that is found so commonly on the backside of buildings. This is where the attention to detail comes into play because it would be very easy to assume a drop bar setup.


%d bloggers like this: