Archive for the ‘1. Forcible Entry’ category

Door Size Up #9

03/01/2011

Here is door size up number 9, Thanks to B. Lynch for putting this one together.

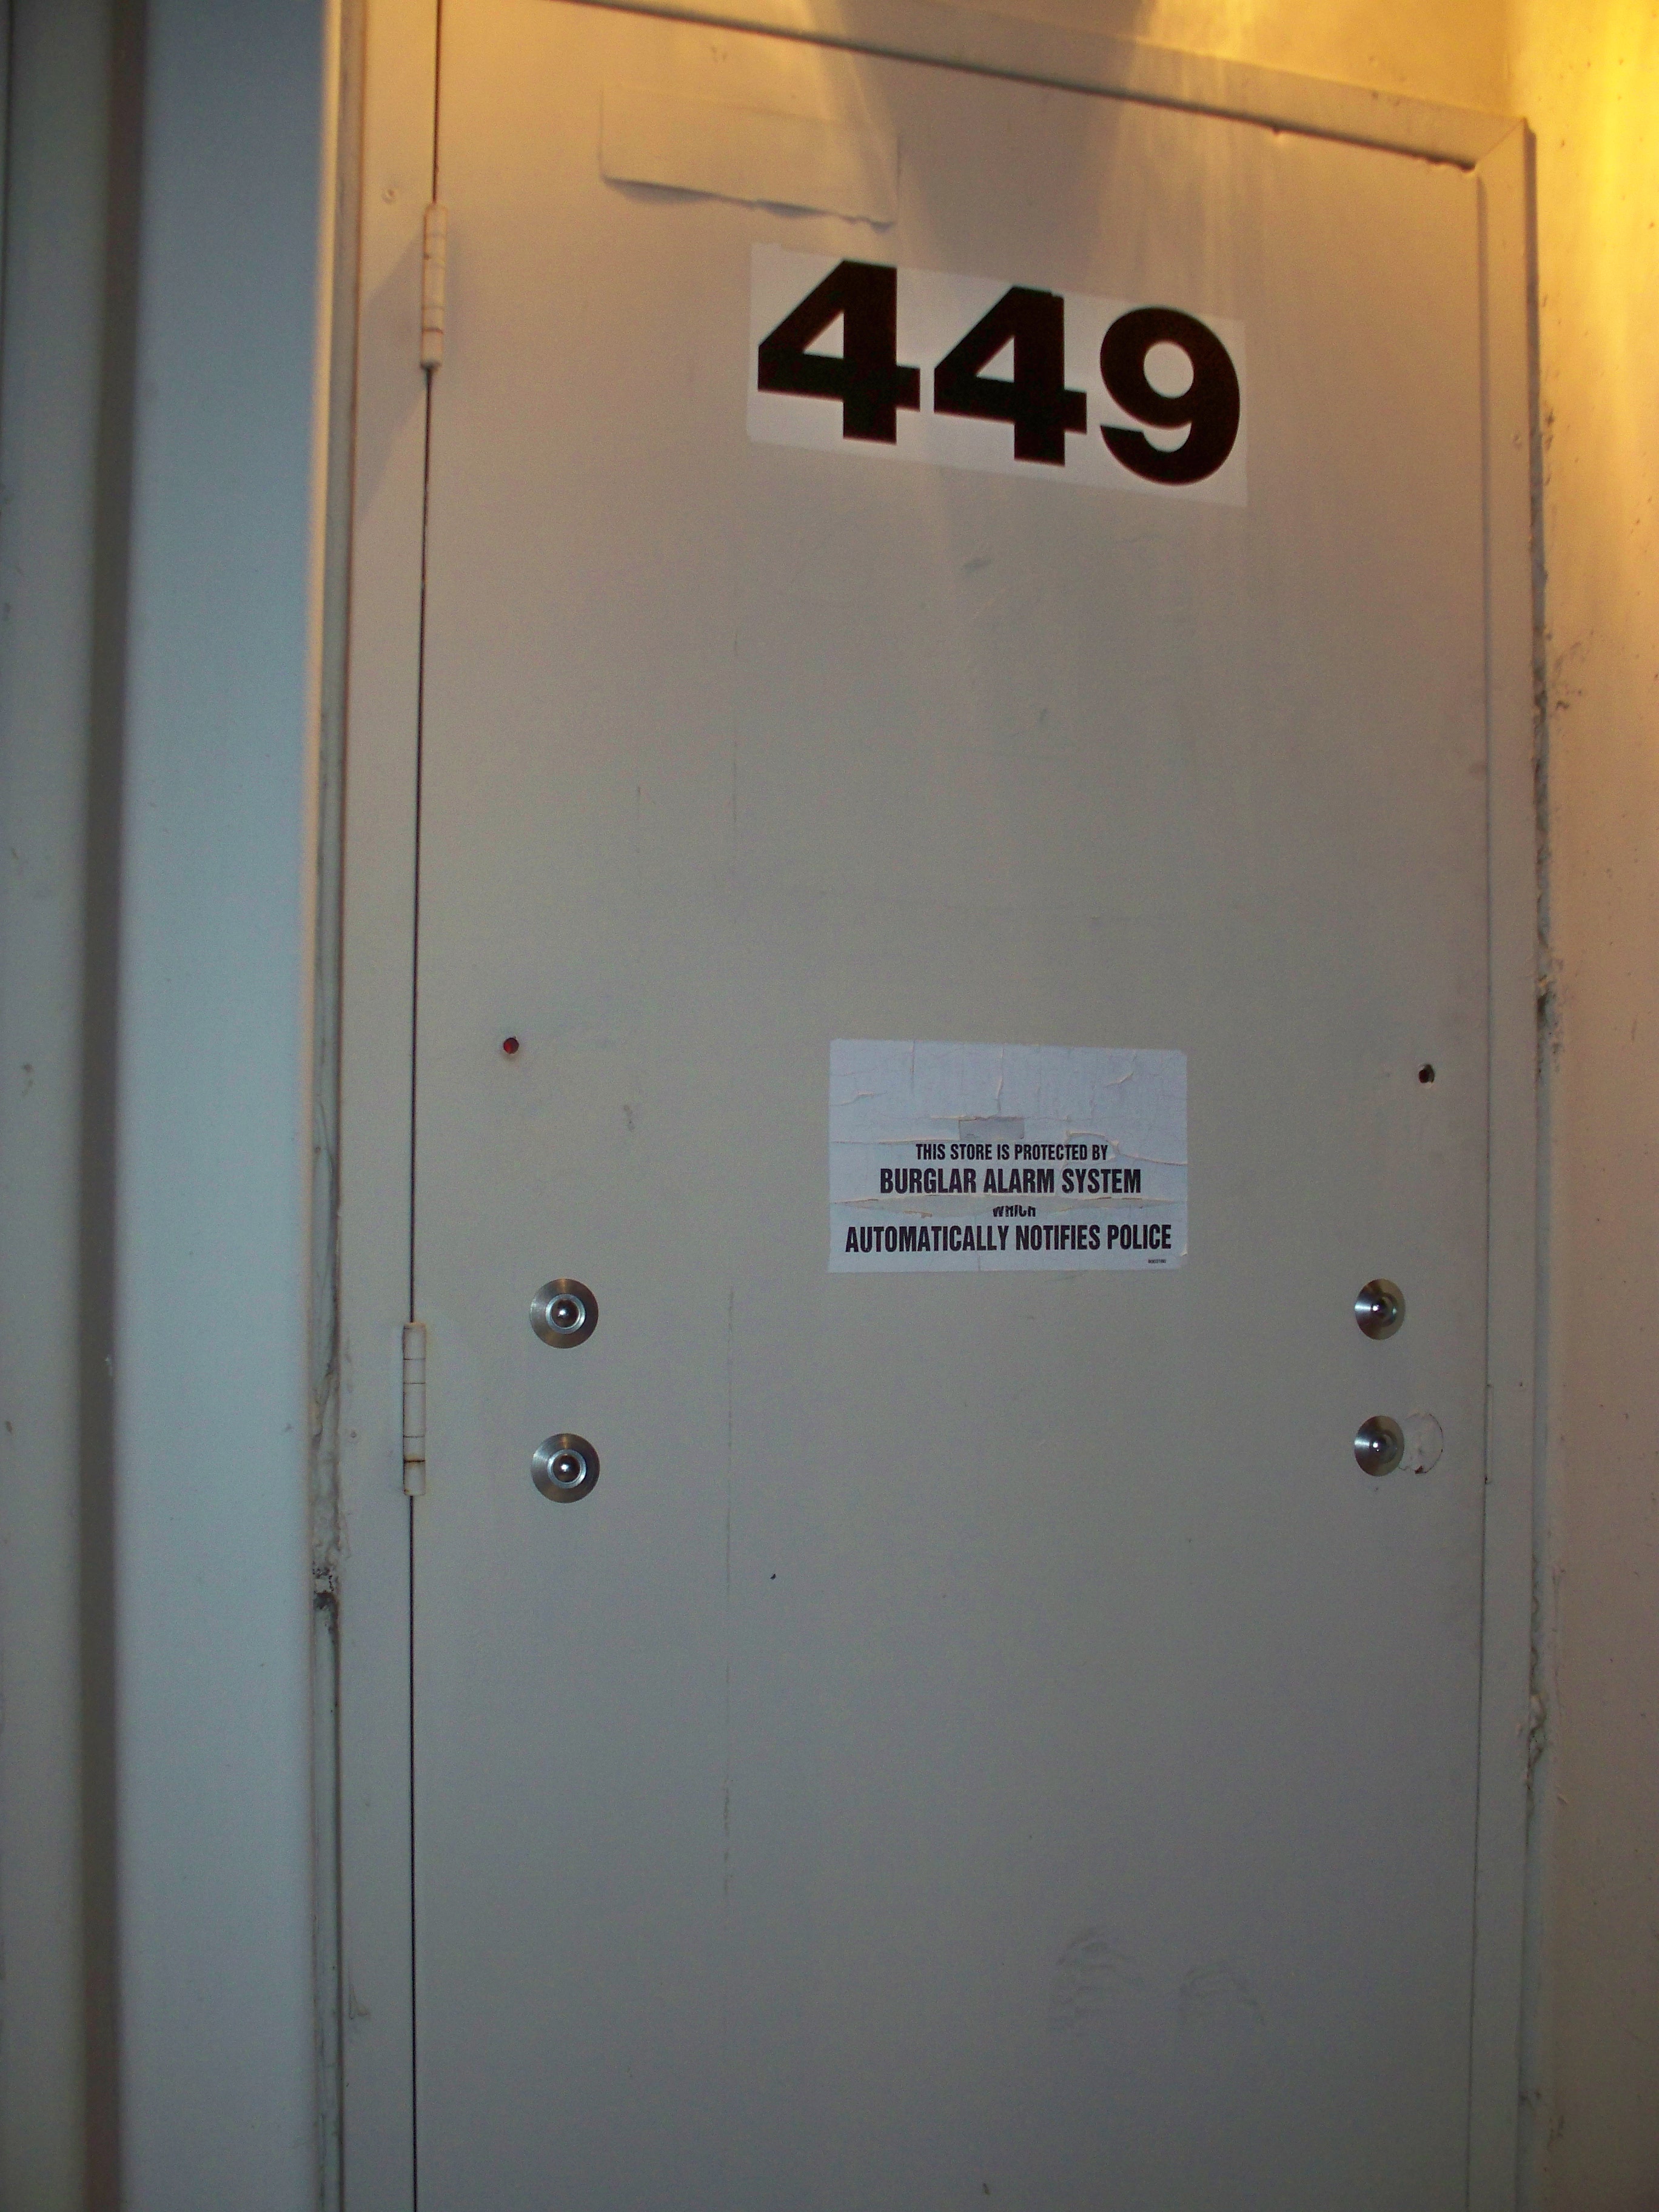
This door is found on the backside of an old single story convenience store.  The store has since been renovated and is now used as a Korean beauty supply shop.  We’ll give you a little information why this size up is unique.  The first is the issue of adequate space on the exterior of the building.  The store backs up to a strip mall and a bar.  There is a wooden fence and gate that is padlocked that accesses the rear of the beauty shop and bar.  There is approximately four feet of space between both buildings hence the exterior pictures had to be taken at an angle.  Run down our key size-up points and see what you think.

We gave you the construction and occupancy but what else do we see?

  1. Metal Frame and metal jamb
  2. Metal door
  3. Primary lock is key in knob with a latch guard
  4. Secondary lock is a commercial deadbolt
  5. The carriage bolt pattern suggests an additional locking device has been added.  The likelihood is small that this is a drop bar because of the unusual pattern of the carriage bolts.  However, in our haste to access this door we may mistake this for a drop bar.  Another note about the carriage bolts is the size of the washers behind them.  This will add difficulty in driving the carriage bolts through the door should we choose to employ that tactic.
  6. We also see slide bolt patterns in the door in three different places.  On the hinge side directly below the top hinge and on the jamb side about a foot below the deadbolt and about three feet above the key in knob lock.

 The only real unknown we see is the unusual pattern of the carriage bolts on the exterior of the door.  Like we said before this could indicate the presence of a traditional drop bar with the two vertical bolts securing a bracket and the other bracket either welded to the door or the frame.  This doesn’t account for the carriage bolt mounted dead center of the door.  Taking a look at the back of the door reveals what we are up against.  As suspected we have a key in knob lock, deadbolt, and three separate slide bolts.  The unusual carriage bolt pattern on the front of the door is a modified drop bar.  The circular pattern on the door reveals how it functions.  The arm swivels and rests in the bracket.  It sits against the frame in an “L” shape and prevents the door from being opened.  

At first glance this door appears to be a formidable task.  Taking a closer look at the locking mechanisms reveals several things.  The slide bolts mounted near the top of the door do not match up with the holes drilled in the frame.  In other words they are not functioning locks.  The bottom slide bolt throws less than 2” into the frame and is held on by only two small screws.  This slide bolt will fail very easily with a little leverage applied via the Irons.  The latch guard, key in the knob, and deadbolt will be fairly easily and quickly defeated by the irons with basic techniques. If the slide bolt is not defeated by way of the conventional techniques on the jamb, we have numerous ways of defeating the carriage bolts either by irons or the saw.  The swiveling drop bar may be defeated be either attacking the lone carriage bolt in the center of the door or attacking the two vertical bolts next to the key in knob lock.  Either way this door will be defeated with by tried and true techniques and the Irons.

Door Size Up #8

01/22/2011

Door number 8 is found on the backside of a 1 story wood frame strip mall, this specific occupancy is some type of ethnic food market. Take a look, run down our key size up points, and see what you think.

We gave you the construction and the occupancy, what else do we see?
1. Metal frame/jamb
2. Commercial metal door
3. Primary Lock is a key in the knob with a latch guard
4. Secondary Lock- Typical deadbolt with latch guard
5. We also see carriage bolts that are in a typical pattern of a slide bolt but an unusal size of the pattern. It is much larger than normal. This pattern is big enough that if we are not paying attention we may mistake it as a drop bar mount or some other type of alternative lock.

To be fair I want to point out that this interior picture is a different door than the exterior picture. Not by much, they have the same locks one is just lacking the latch guards and if you look at the bolt patterns, one of the slide bolts is set closer to the jamb. These were both on the same occupancy I just could not find the interior picture of the door with latch guards. Regardless it does not matter for the sake of the drill.

Taking a closer look at this  slide bolt we can see how significant of a throw this door has. Most slide bolts only make it into the jamb an inch or two at the most. This one looks to be 4 inches or more. That would mean unlike the typical slide bolt this will not only go into the metal jamb but all the way into the wood framing for the door. We will probably start to realize this upon attacking this door with the irons. If we determine we cannot defeat this slidebolt with the irons in a decent amount of time we must look at our other ways of attacking this setup.

The latch guards, key in the knob, and deadbolt will be fairly easily and quickly defeated by the irons with tried and true techniques. If the slide bolt is not defeated by way of the conventional techniques on the jamb, we have numerous ways of defeating the carriage bolts either by irons or the saw that will disable this bolt completely.

Thank You For a Great Class

11/12/2010

We had another very successful Hands On Forcible Entry Class this last weekend hosted by the Stratmoor Hills FD. This open enrollment class had 30 participants from 10 different fire departments throughout the state. We had a great bunch of guys go through consisting of first year firefighters all the way up to 25 year veterans. This brought a great variety of ideas and experiences.  We have received some great feedback and are in the process of setting up classes with multiple different agencies. Keep your eyes open if you would like to attend the next open enrollment class or contact us if you are interested in hosting us at your own department.

Those of you who were in the class feel free to add your feedback on the class in the comment section.

This slideshow requires JavaScript.

All participants forced doors multiple times using several different 2 person techniques and 1 person techniques. Everybody was on both pieces of the Irons multiple times. Participants also were able to defeat drops bars and carriage bolts using both Irons and Saws. Everybody also performed window bar cuts, defeated padlocks  and were able to pull cylinders using Thru The Lock tools. After pulling cylinders, participants were each able to  defeat every type of the most common locks found by tripping them with numerous Thru the Lock tools. The was all done following a detailed and interactive door size up class in the morning and a short class on fine tuning our tools to take full advantage of them.
Thank you to all who came out last weekend for your support and to all of you that have been in the previous classes this year.

Those of you who were in the class feel free to add your feedback on the class in the comment section.

Door Size Up #7

11/01/2010

You can take a look at sizing up this door and give it your best shot if you like. But as you can see the door is not telling us a whole lot. Our most important size up feature regarding this type of door is the neighborhood, the occupancy, and playing the odds. This is located in a busy commercial area that sees a fair share of high crime. From walking buildings in this area we already know that most businesses have had numerous break-ins on a yearly basis. This building also happens to be a pawn shop, which in our district (like most) equals extra fortification. Then we move to the fact that this is a back door to the occupancy and the only entry not seen from the main front doors on the street side.

All of these points added up would tell us that we are going to have a heck of a door to go at. That is what should cause us concern about what actually is showing. Sometimes nothing showing on the door combined with all of our other size up points gives us all the warning we need. Nothing showing equals some creative security on the inside. Any business owner that has been broken into countless times tends to learn there tactics.


Another point that we have hit on before is the primer on the door that is showing. This usually is a good sign that some fabrication has taken place. As you can see below, this door has double drop bars made out of steel 2x4s. The mounts have been welded on a half inch steel frame that goes around the entire edge of the door. These drop bars have padlocks set in them at night securing the bars to the mounts. If that is not enough we then have a homemade gate made out of angle iron secured with its own set of padlocks. 

November 7th Forcible Entry Class

10/17/2010

Announcing an Open Enrollment Forcible Entry Class on November 7th 2010.

The class on November 6th is completly full. We have recieved a ton of emails with questions concerning the classes on these two days so we wanted to clear it up. November 7th is the same 1 day class just on a different day. We have already filled the November 6th class and now the November 7th class is almost halfway full.

Email ironsandladders@hotmail.com or call 719 660 4740 to sign up for the November 7th class

November 6th and 7th Forcible Entry Class

10/12/2010


Due to a large demand, and the fact that we have more than filled up the first day of class we are now going to offer another day to whomever is interested. November 7th is now available for open enrollment regarding the same class that is being offered on November 6th.  Due to the second day be added spots may open up on the 6th. So for any firefighter interested in either of the days please email us at ironsandladders@hotmail.com

Thank you for the overwhelming response of this class. All details and times are the same as the November 6th class. Please refer to the flyer in the original post if you need any more details.

November 6th Hands On Forcible Entry Class

09/20/2010

Announcing a Hands On Forcible Entry Class on November 6th of 2010. 

We have had numerous requests to run another open enrollment class that welcomes firefighters from any department. This training will consist of a morning classroom session followed by hands on forcible entry for the remainder of the day. Seating is limited allowing each participant to have a large amount of hands on time.

Click on the mini flyer below for a downloadable full size version with full details of the class

To register or for more information email IRONSandLADDERS@hotmail.com or call
Ryan (719)-660-4740
Nick (719)-649-8060
Bryan (719)-331-7284 

Tonights Matchup….Irons v.s. Carriage Bolts

09/19/2010

As you know we are fans of the Irons. We believe in the Irons as our “Plan A” until a door shows us to move on to Plan B (Which still probably involves the Irons). Our opinion is typically the minority when it comes to this thought process, it seems most of the time people lean towards saws as Plan A.  Not that saws shouldn’t be in your compliment of forcible entry options, because they absolutely are a necessary tool. However an Irons team that is polished and have a game plan can defeat a wide variety of doors quicker and more reliably than saws on many occasions. Some other big advantages is that Irons will not have mechanical problems, they always start, you will not run out of blade, and almost every rig in the nation carry them. The following technique is great for engine companies and truck companies alike.

Drops bars are a very common secondary security device added to commercial doors. We have shown many different types of drops bars in our door size up posts over the last few months. While there are some limitations depending on the construction of the drop bar mount, a large portion of carriage bolt setups can be defeated with this tactic. This primarily applies to outward swinging metal doors. The mounts are defeated by using a set of Irons to drive the bolts through the door disabling the holding power of the drop bar. The series of pictures below will cover this technique in detail. This combined with conventional forcible entry techniques for the primary locks is a powerful combination.

Sizing up the drop bar is key to determine if this tactic may be successful or not. We have tried this tactic on a wide variety of doors and drop bar setups. By doing this we have found many doors it works well on, and other setups that it may not be your best option. The most common carriage bolts used for drop bars are usually 3/8 inch, which are fairly easy to defeat this way. We have also used this on 1/2 and 3/4 inch carriage bolts with only a little added difficulty. The three doors below are good examples of bolts that can be quickly defeated. If you look closer at the door on the right you can see washers installed, this is one of the best things a business owner can install to prevent his carriage bolts from being defeated. The bolts on the right can still be defeated but they will take longer, the larger the washers the more difficult it will be.

Click the thumbnails below for a bigger picture.

Below are some examples of setups that will slow us down or completely prevent us from using this technique. When you look at the first door you can see the washers are very large, these have so much surface area that it becomes more difficult to drive through the metal. This is not impossible just slower. The next two doors however should tell you to try a different technique. These have steel plates mounted on the outside that are under both of the bolts. You cannot drive these through in an efficient manner. The last photo is an interior look of a drop bar. This bar will look like a good candidate from the outside but as you can see the inside is welded to the door. The list goes on, it is just important to recognize that if the operation is not progressing like it would on most bolts, move on to Plan B.

Enough rambling about the size up part of this operation, here are the steps of actually doing it. We are assigned to a door that needs forced, it has a normal key in the knob lock, a deadbolt and a carriage bolt pattern that is indicating a drop bar. Always start with conventional forcible entry, you never know when the bar has not been put in place and all this door may be is the primary locks. After we attempt our Irons work on the lock side and we determine the drop bar is also part of the resistance, we move on to attacking the bolts. You should start with the bolts on the lock side of the door, not the hinge side. Many times you will only have to defeat those first two bolts and one of two things happen. Either the mount will fall causing the drop bar to fall out, or it may stay in place but you gain enough give in the door to leverage it open. Regardless starting on the lock side is important, and then work your way to the hinge side only if it is needed. After the first set of bolts is defeated go back to conventional forcible entry to see if this was all you needed.

Place the pike of the Halligan either right above or below the bolt head. Try to aim the curve of the pike so it will follow the length of the bolt.

Drive the Halligan in until it is flush with the door, this is the relief hole and it will significantly weaken the metal that holds this bolt, if not completely free it up. While the pike is set, twist the Halligan back and forth once to weaken the material further.

Next center the adze on top of the bolt head and drive it through. This will have a little bit more resistance but should still only take a few hits. If it is not moving through easily, stop and take a look at whats holding it up and reposition.

This should defeat the first bolt. The important thing is to be creative, the doors will not always react and tear the same. But as a rule of thumb this is a great way to start. If the mounts on the back are of solid construction, one variable may arise. The mounting may be too ridgid to be able to drive a bolt completely through while the other one is still in place. If this happens drive the bolt through the outside skin of the door, then move to the other bolt on the same mount and drive it through the outside skin. Once both bolts are in between the two skins of the door you can resume driving them the remaining distance.

The only way to get a feel of this is to try it. Mount an old metal door and put a bunch of bolts on it. Get different sizes, add washers, and add drop bar mounts to the back side. Practicing this technique makes for an effective attack with you Irons. Below is a video demonstrating a full speed drill of us driving some bolts through a commercial metal door. We have some other videos of an interior and exterior footage of an actual drop bar being defeated. We will add that in a second post at a later date. This is already long winded enough for the day.

Door Size Up #6

08/25/2010

Door Size Up……The hinge side?

When you’re talking shop about forcible entry, typically outward swinging doors will come up at some point.  You tend to notice that many times firefighters will make their “Plan A” taking the hinges with a saw. I think this is a tactic that gets higher priority then it maybe needs to. Many of these doors that we resort to taking the hinges right away could be easily defeated with a set of irons. I think the saw/hinge tactic is also conveyed by mouth as being a very quick option, but when in reality this can be a time-consuming project. I am not saying it shouldnt be an option, but for me it is usually going to be lower on the list. 

Granted there is a big difference in hinges and their quality, which will have an effect on how quick we can cut them. But a big disadvantage is the unknown behind the door. Two of the most common secondary locks that are found in my city are drop bars and slide bolts. These can be the “unknown” that we will not realize until we have spent all of our time cutting those hinges. Whereas if we had started with conventional forcible entry we know what we are going up against and can change our plans based on this.

Outward swinging metal doors can be defeated numerous different ways with the irons. The door we see below is showing our typical key in the knob lock with the common deadbolt above it. We also see a latch guard has been installed and a set of two small bolts higher up to door that could be a smaller gauge secondary lock.  This picture is a door where I have heard people say go straight to the saw and the hinges. My personal belief is that an irons team with a game plan and solid irons work will defeat this far before a saw will.

Then take a look at the interior picture, it is a great example of a setup that will make the hinge side that much worse. We have a video we will post on here fairly soon showing numerous different ways of conventional irons work with different lock setups.

Fine Tuning Your Halligan

08/08/2010

                           By R. Royal

 The Halligan (Pro Bar)  is hands down the most important and versatile forcible entry tool we carry on the rigs. We have had a few different articles on this website regarding the Halligan, some about the differences between the Pro Bar and its imitations, also understanding the advantages of bevel to the jamb, versus bevel to the door during inward swinging forcible entry operations. This next article is to discuss a few little modifications that can be done that make this tool even more superior.  

The first two improvements just assist you in seeing what you should be feeling when setting the tool. What we have done as seen in the pictures below is scratch a small thin line and add some drops of red paint to show our proper depths when setting the tool. After enough practice with the tool, setting to the proper depth should come  just by feel, but adding these marks just makes it that much easier.

The first mark we have added is on the Adze end. This mark has been scratched in at about 1 3/4. This is the standard width of commonly found doors, by making this mark it will assist us in knowing when the adze is about to hit the jamb on outward swinging doors. This can assist us in navigating the Adze around the back of the door and not tearing into the jamb. It also can prevent us from stopping to shallow and then tearing the skin and seam of the door when we start to make our gap.

The second mark is made on the fork end and is used for inward swinging doors.  This mark has been made to show where the “crotch” of the fork is. As you can see in the picture the crotch is where the two forks come together and meet. We want to make our marks on both sides lining up with the crotch of the fork. This landmark comes from the term “crotch to stop”. Basically our tool is set to the proper depth when this “crotch” or red mark has lined up near the back of the door stop or jamb. This can be very helpful to prevent you from stopping to shallow, or going to deep when the Halligan is being driven in very quickly. If we drive it in to far we lose a large amount of leverage when we go to force. When it is stopped to shallow, it becomes very easy for the forks to slip out when you force the bar. Again this just makes it a little easier to see, and is a very big aid in teaching the concepts of crotch to stop.

The next two pictures below show what should be  necessary maintenance to the tool. The next step is a very slight change but goes a real long way. I think this is the number one improvement you can make to this tool. This may be difficult to explain through writing, but we will give it a shot. When the Halligan comes from the factory the ends of the fork will have a bevel to it. It is a dull bevel and is in the center, on the tip of these forks. What we have done is filed down the ends of these forks slightly, thinning them and giving the tips more of an edge. Instead of having the dull bevel in the middle of the tips, they come to a clean edge on the inside of the bevel.  This makes a huge difference on inward swinging doors that are set very tight to the jamb. It will make enough difference that the clean edge will probably bite and start to navigate around the door whereas the old bevel may tend to bounce off many times.

Lastly we have the squared shoulders of the fork. When the bar comes from the factory it has a small curve from the handle into the forks. What you can do is file down the curve into a nice right angle like you see here. This has created a new striking surface that we can use when alternate techniques are required. Such as tight hallways or cellar entrances, low visibility, or when there is only ne firefighter available to start forcible entry,  this small change allows that to happen. This will enables one guy to effectively get started doing both the striking and the Halligan work on a door (which we will hit on a later date).

You can find numerous different improvements out there that have been done to these tools, we feel these are the most advantageous for what we do and really can make a difference in how they perform. Like many other articles on here, again we say we didn’t invent this stuff, just feel it is worthy information that should be passed on to those who wish to use it.